Blogging the Hard Way
There’s an old saying:
One must first polish his/her tools to do a good job.
I love to polish things but hesitate to do real jobs. That’s my problem, and I have realized that for a long time. Anyway, in this article, I’d like to briefly share how I set up the on-prem infrastructure for blog hosting featuring:
- static blog with version control
- containerized environment managed by Kubernetes
- push-based GitOps using Gitea and Drone
- HTTPS connection secured by cert-manager
- publicly accessible endpoint powered by inlets tunnel
Though I mentioned “briefly,” it is a lengthy post. So please bear with me a little more.
The Why
Some of you might wonder why all of these work just for one static blog. Why bother? And I’ll tell you: there’s no strong reason for doing this; it’s just because it is cool. We all love cool things, right? Besides, I learned a lot by going through these. Do you want to get a peek at how GitOps works? Curious about what role Kubernetes plays in modern software industries? Get your hands dirty, and you’ll come out with your conclusion.
There’s another debate on cloud and on-prem. “Why do you set up all of these on-prem but not on the cloud,” you might ask. It may be easier to put all of these on the cloud since there’re various services and integrations a cloud provides that you can leverage. But it can also be harder to understand and debug when you host everything on the cloud. I’m not saying that cloud is bad; it’s just how I learn things. I prefer to get familiar with new tech on the ground, then try to get the same things running on the cloud.
Overview
Writing articles in Markdown format using my favorite editor on mobile devices.
Pushing changes (articles) to the Git server, and voilà!
And that is just the tip of the iceberg. However, the work behind the scene is like …
Yes, in case you were wondering, I’m just trying to shoot myself in the foot. However, it does work pretty well once you set it up.
The objective of this setup is to encourage me to write more. It is hard for me to write at least one article per month, though I took many notes as ingredients. Turning a “note” or “memo” into an “article” takes a huge amount of effort. So there must be something to stimulate and help me get through this.
Watching every part collaborate, i.e., automation, brings me great joy. I decided to build a platform with pipelines to write articles with version control, some basic syntax checks, and at the same time, auto-publishing. The whole infrastructure consists of the following components:
- Dev environment
- The blog itself with Jekyll static site generator
- inletsctl (tunneling tool)
- On-prem Kubernetes cluster
- MetalLB (load balancer controller)
- ingress-nginx (ingress controller)
- inlets-operator (tunnel service)
- cert-manager
- Gitea (git service)
- Drone (CI/CD service)
- VPS with publicly accessible IPs
I already have a 4-node Kubernetes cluster (one control plane node and three worker nodes) in my home lab. Though it’s not a highly available setup, it’s enough for me as a playground. For this article, it’s doable with a single-node cluster provisioned by minikube or kind.
Static Blog
Regarding blogging and version control as requirements, static site generator
like Jekyll, Pelican, Hugo, etc., is the right choice. Here I use Jekyll to
generate my blog. You can choose whatever you want. I won’t go through the
details about how to write Markdown syntax documents and turn them into HTML
files via jekyll commands. Please refer to Jekyll’s official
documentation for installation and usage if needed.
With a static site generator, you can treat Markdown files as the blog’s source
code and somewhat “compile” them to become a visualized result in the form of
HTML (of course, there’s much more like CSS and JavaScript to make the blog not
so ugly). As we all know, source code can be version-controlled, and so do
markdown files. Now the entire blog can be version-controlled using Git locally.
To bootstrap a new site (blog), just run the following command in your local environment:
gem install bundler jekyll
mkdir blog && cd blog/
jekyll new blog
The site structure is as follows:
$ tree .
.
├── 404.html
├── Gemfile
├── Gemfile.lock
├── _config.yml
├── _posts
│   └── 2023-02-01-welcome-to-jekyll.markdown
├── about.markdown
└── index.markdown

2 directories, 7 files
The actual blog posts will be under _posts/ directory.
For linting, markdownlint is a good choice:
gem install mdl
mdl _posts/
If the output contains warnings, there are violations of the rules in the markdown files that need to be fixed.
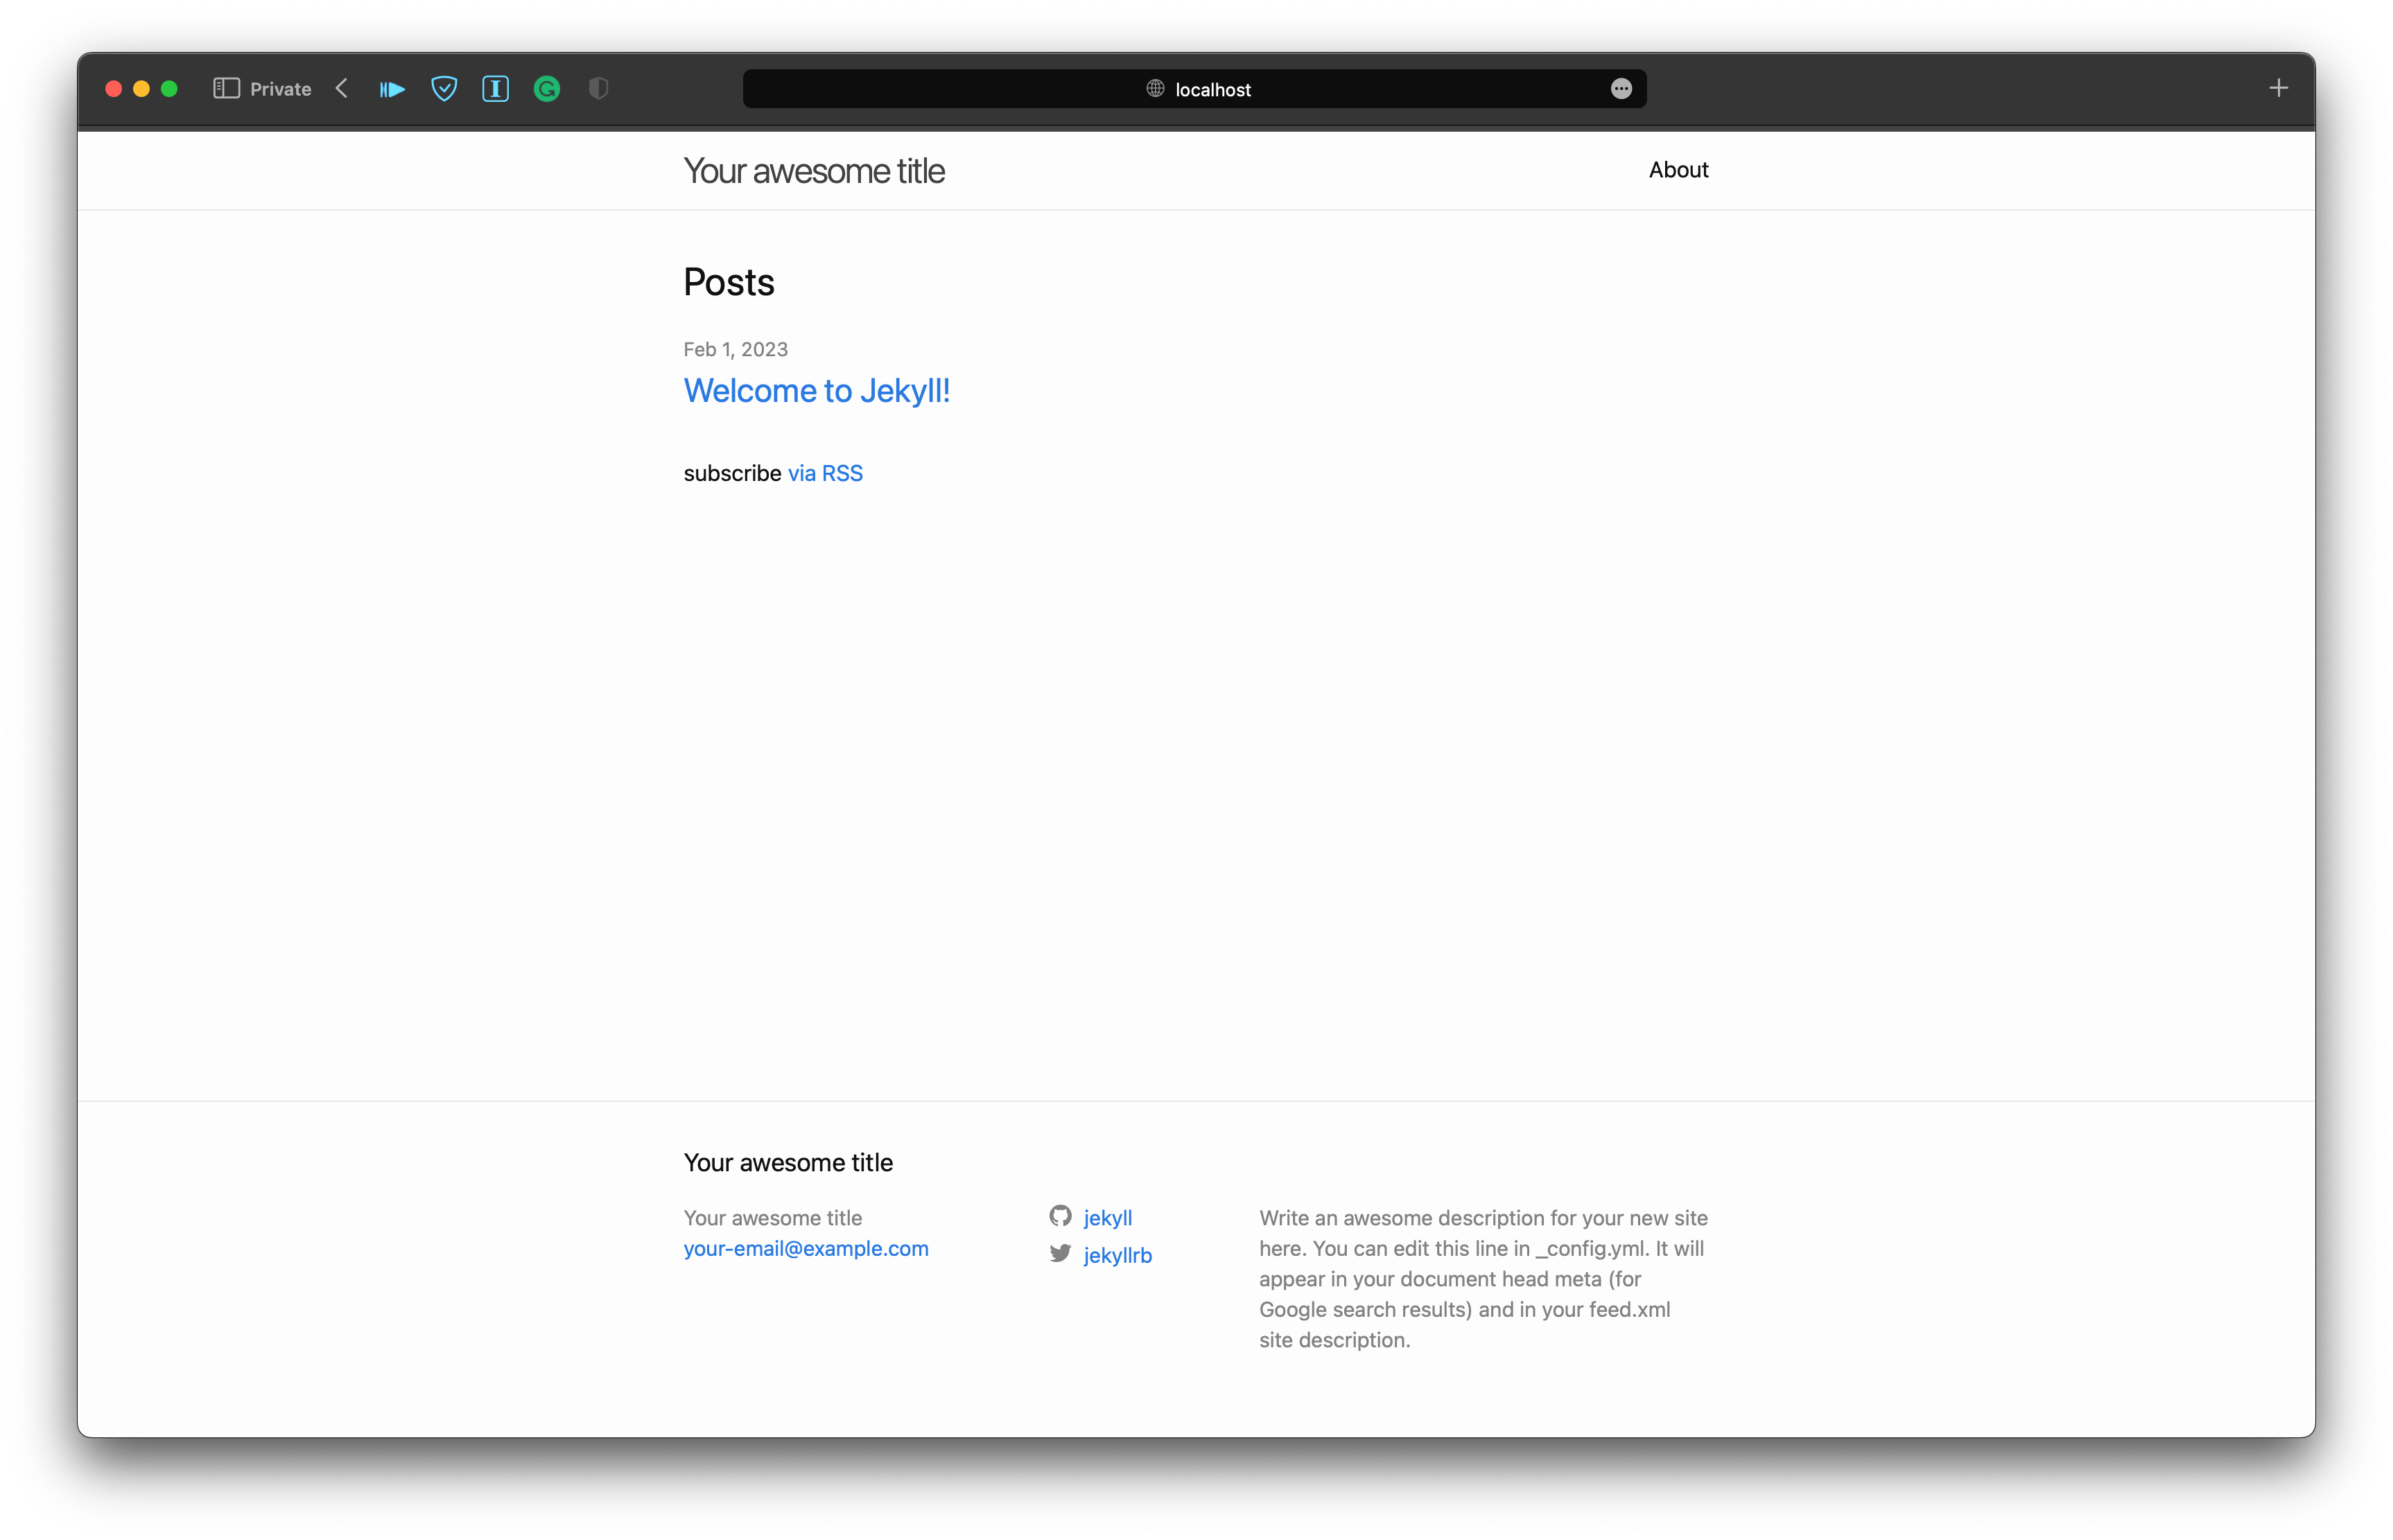
To run the blog and see the result, you can run the following command and head to http://localhost:4000 in your browser.
bundle
exec jekyll serve
Okay, enough Jekyll hands-on. Let’s go to the next phase.
Manually Run the Blog Like an Octopus
We’re not satisfied with the status quo. We can’t just leave the command bundle
exec jekyll serve running in the terminal and tell everybody “Hey, come visit
my new shiny blog!” That’s intolerable, regardless of the reachability,
security, and maintenance perspective.
The static blog is better to be hosted under a web server like Nginx and exposed to the Internet for anyone to access. So we’re going to combine the blog with a web server into a container and expose it using inlets.
Containerization
Static site generator takes Markdown files as input and outputs HTML files under
_site by default. Typically, one has to set up a web server to serve those HTML
files so that users can access the blog via browser. There’re three things to
do:
- Build: generating
.htmlfrom.md - Ship: moving the output directory full of
.htmlfiles to the serving location specified in the configuration of the web server - Run: kick off the web server which serves the static blog
And that is exactly the motto of Docker (though it’s changed from “Ship” to “Share” nowadays). As I’m learning Kubernetes and its ecosystem, I think it is a great chance to build the pipeline on top of the container management platform. So the overall workflow is built on the Kubernetes cluster in my home lab.
Docker is quite an elegant and well-engineered tool. We can create the blog
container image by defining a Dockerfile simply copied from what manual steps
we will take to build and host the blog:
FROM ruby:3.1.3-buster AS build
COPY blog /app
WORKDIR /app
RUN bundle install \
    && bundle exec jekyll build

FROM nginx:1.19.7-alpine AS final
COPY --from=build /app/_site /usr/share/nginx/html
Finally, we can build the container image with the following command:
docker build -t starbops/blog:v0.1.0 .
With a container image, it’s super easy to start an instance of the blog:
docker run -d -p 8080:80/tcp starbops/blog:v0.1.0
Head over to http://localhost:8080 in the browser and there will be the same
page as we saw from bundle exec jekyll serve but hosted in a container.
Hooray!
Inlets
The next step is trying to expose the blog to the Internet since we’re still running the blog container in the development environment, e.g. our laptop. Most of us will not have an Internet-accessible public IP address with our laptops, right? Tunnels to the rescue!
inlets is a cloud-native tunneling solution with versatile user scenarios. There’s already an introduction in my other blog post which you might want to take a look at. We can leverage the solution to expose the blog to the outside world.
On the other hand, inletsctl helps provision an inlets exit server and
provides handy hints for you to construct a tunnel to the desired backend
service. It integrates several cloud service providers so users can choose
whichever they prefer.
$ curl -sLSf https://inletsctl.inlets.dev | sudo sh
$ inletsctl version
 _       _      _            _   _
(_)_ __ | | ___| |_ ___  ___| |_| |
| | '_ \| |/ _ \ __/ __|/ __| __| |
| | | | | |  __/ |_\__ \ (__| |_| |
|_|_| |_|_|\___|\__|___/\___|\__|_|

Version: 0.8.19
Git Commit: 2379c374e879b91c8c4024b24e4954e013524e8e
Build target: darwin/arm64
We’ll need the inlets-pro binary later, so download it via inletsctl and
prepare a valid license under
$HOME/.inlets/LICENSE:
$ sudo inletsctl download
Password:
2023/02/01 16:34:12 https://github.com/inlets/inlets-pro/releases/tag/0.9.13
Starting download of inlets-pro 0.9.13, this could take a few moments.
Download completed, make sure that /usr/local/bin is on your path.
  inlets-pro version

$ inlets-pro version
 _       _      _            _
(_)_ __ | | ___| |_ ___   __| | _____   __
| | '_ \| |/ _ \ __/ __| / _` |/ _ \ \ / /
| | | | | |  __/ |_\__ \| (_| |  __/\ V /
|_|_| |_|_|\___|\__|___(_)__,_|\___| \_/

  inlets (tm) - Cloud Native Tunnels
Version: 0.9.13 - 90e5c951334923b4d6d97628be054eb6c39a6170
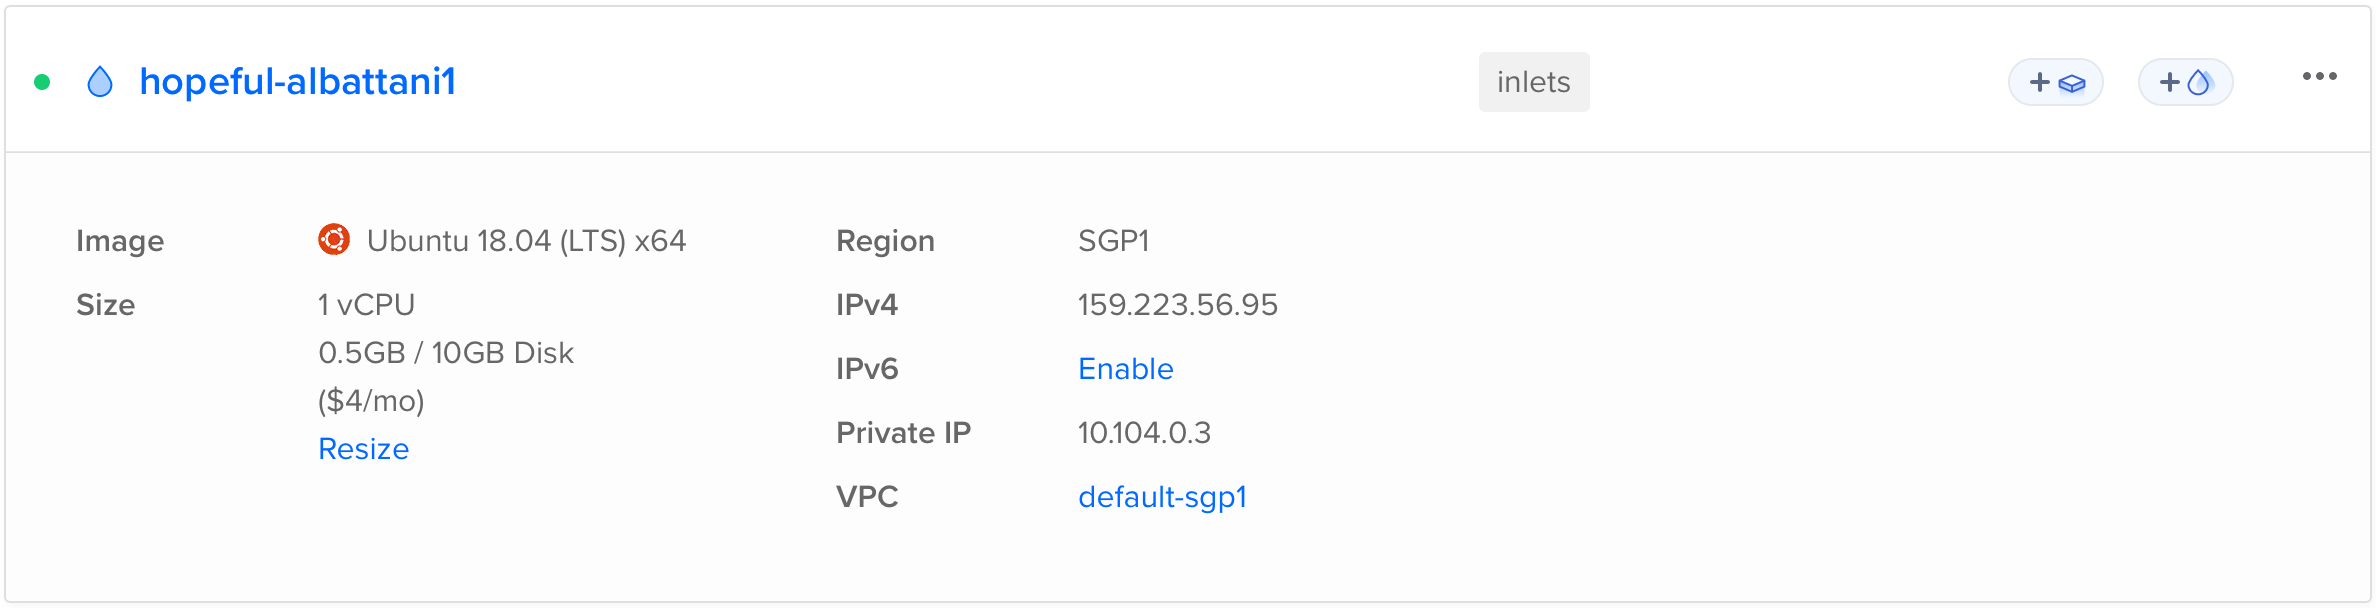
Here I choose DigitalOcean as the provider (need a valid access token generated from their website).
$ inletsctl create \
    --provider digitalocean \
    --access-token-file $HOME/.inlets/do-access-token \
    --region sgp1 \
    --plan s-1vcpu-512mb-10gb \
Using provider: digitalocean
Requesting host: hopeful-albattani1 in sgp1, from digitalocean
2023/02/02 09:48:37 Provisioning host with DigitalOcean
Host: 338720570, status:
[1/500] Host: 338720570, status: new
...
[15/500] Host: 338720570, status: active
inlets Pro TCP (0.9.9) server summary:
  IP: 159.223.56.95
  Auth-token: d7kGahG1KFELADyVd3oTMjaM4SyEgxVhI60XxTQBSNv0GqQk6xgJGKrpVvM8X9Vm

Command:

# Obtain a license at https://inlets.dev/pricing
# Store it at $HOME/.inlets/LICENSE or use --help for more options

# Give a single value or comma-separated
export PORTS="8000"

# Where to route traffic from the inlets server
export UPSTREAM="localhost"

inlets-pro tcp client --url "wss://159.223.56.95:8123" \
  --token "d7kGahG1KFELADyVd3oTMjaM4SyEgxVhI60XxTQBSNv0GqQk6xgJGKrpVvM8X9Vm" \
  --upstream $UPSTREAM \
  --ports $PORTS

To delete:
  inletsctl delete --provider digitalocean --id "338720570"
Follow the instruction shown in the output, and modify the UPSTREAM and PORTS
environment variables to point to the blog container.
export PORTS="8080"
export UPSTREAM="localhost"
inlets-pro tcp client --url "wss://159.223.56.95:8123" \
  --token "d7kGahG1KFELADyVd3oTMjaM4SyEgxVhI60XxTQBSNv0GqQk6xgJGKrpVvM8X9Vm" \
  --upstream $UPSTREAM \
  --ports $PORTS
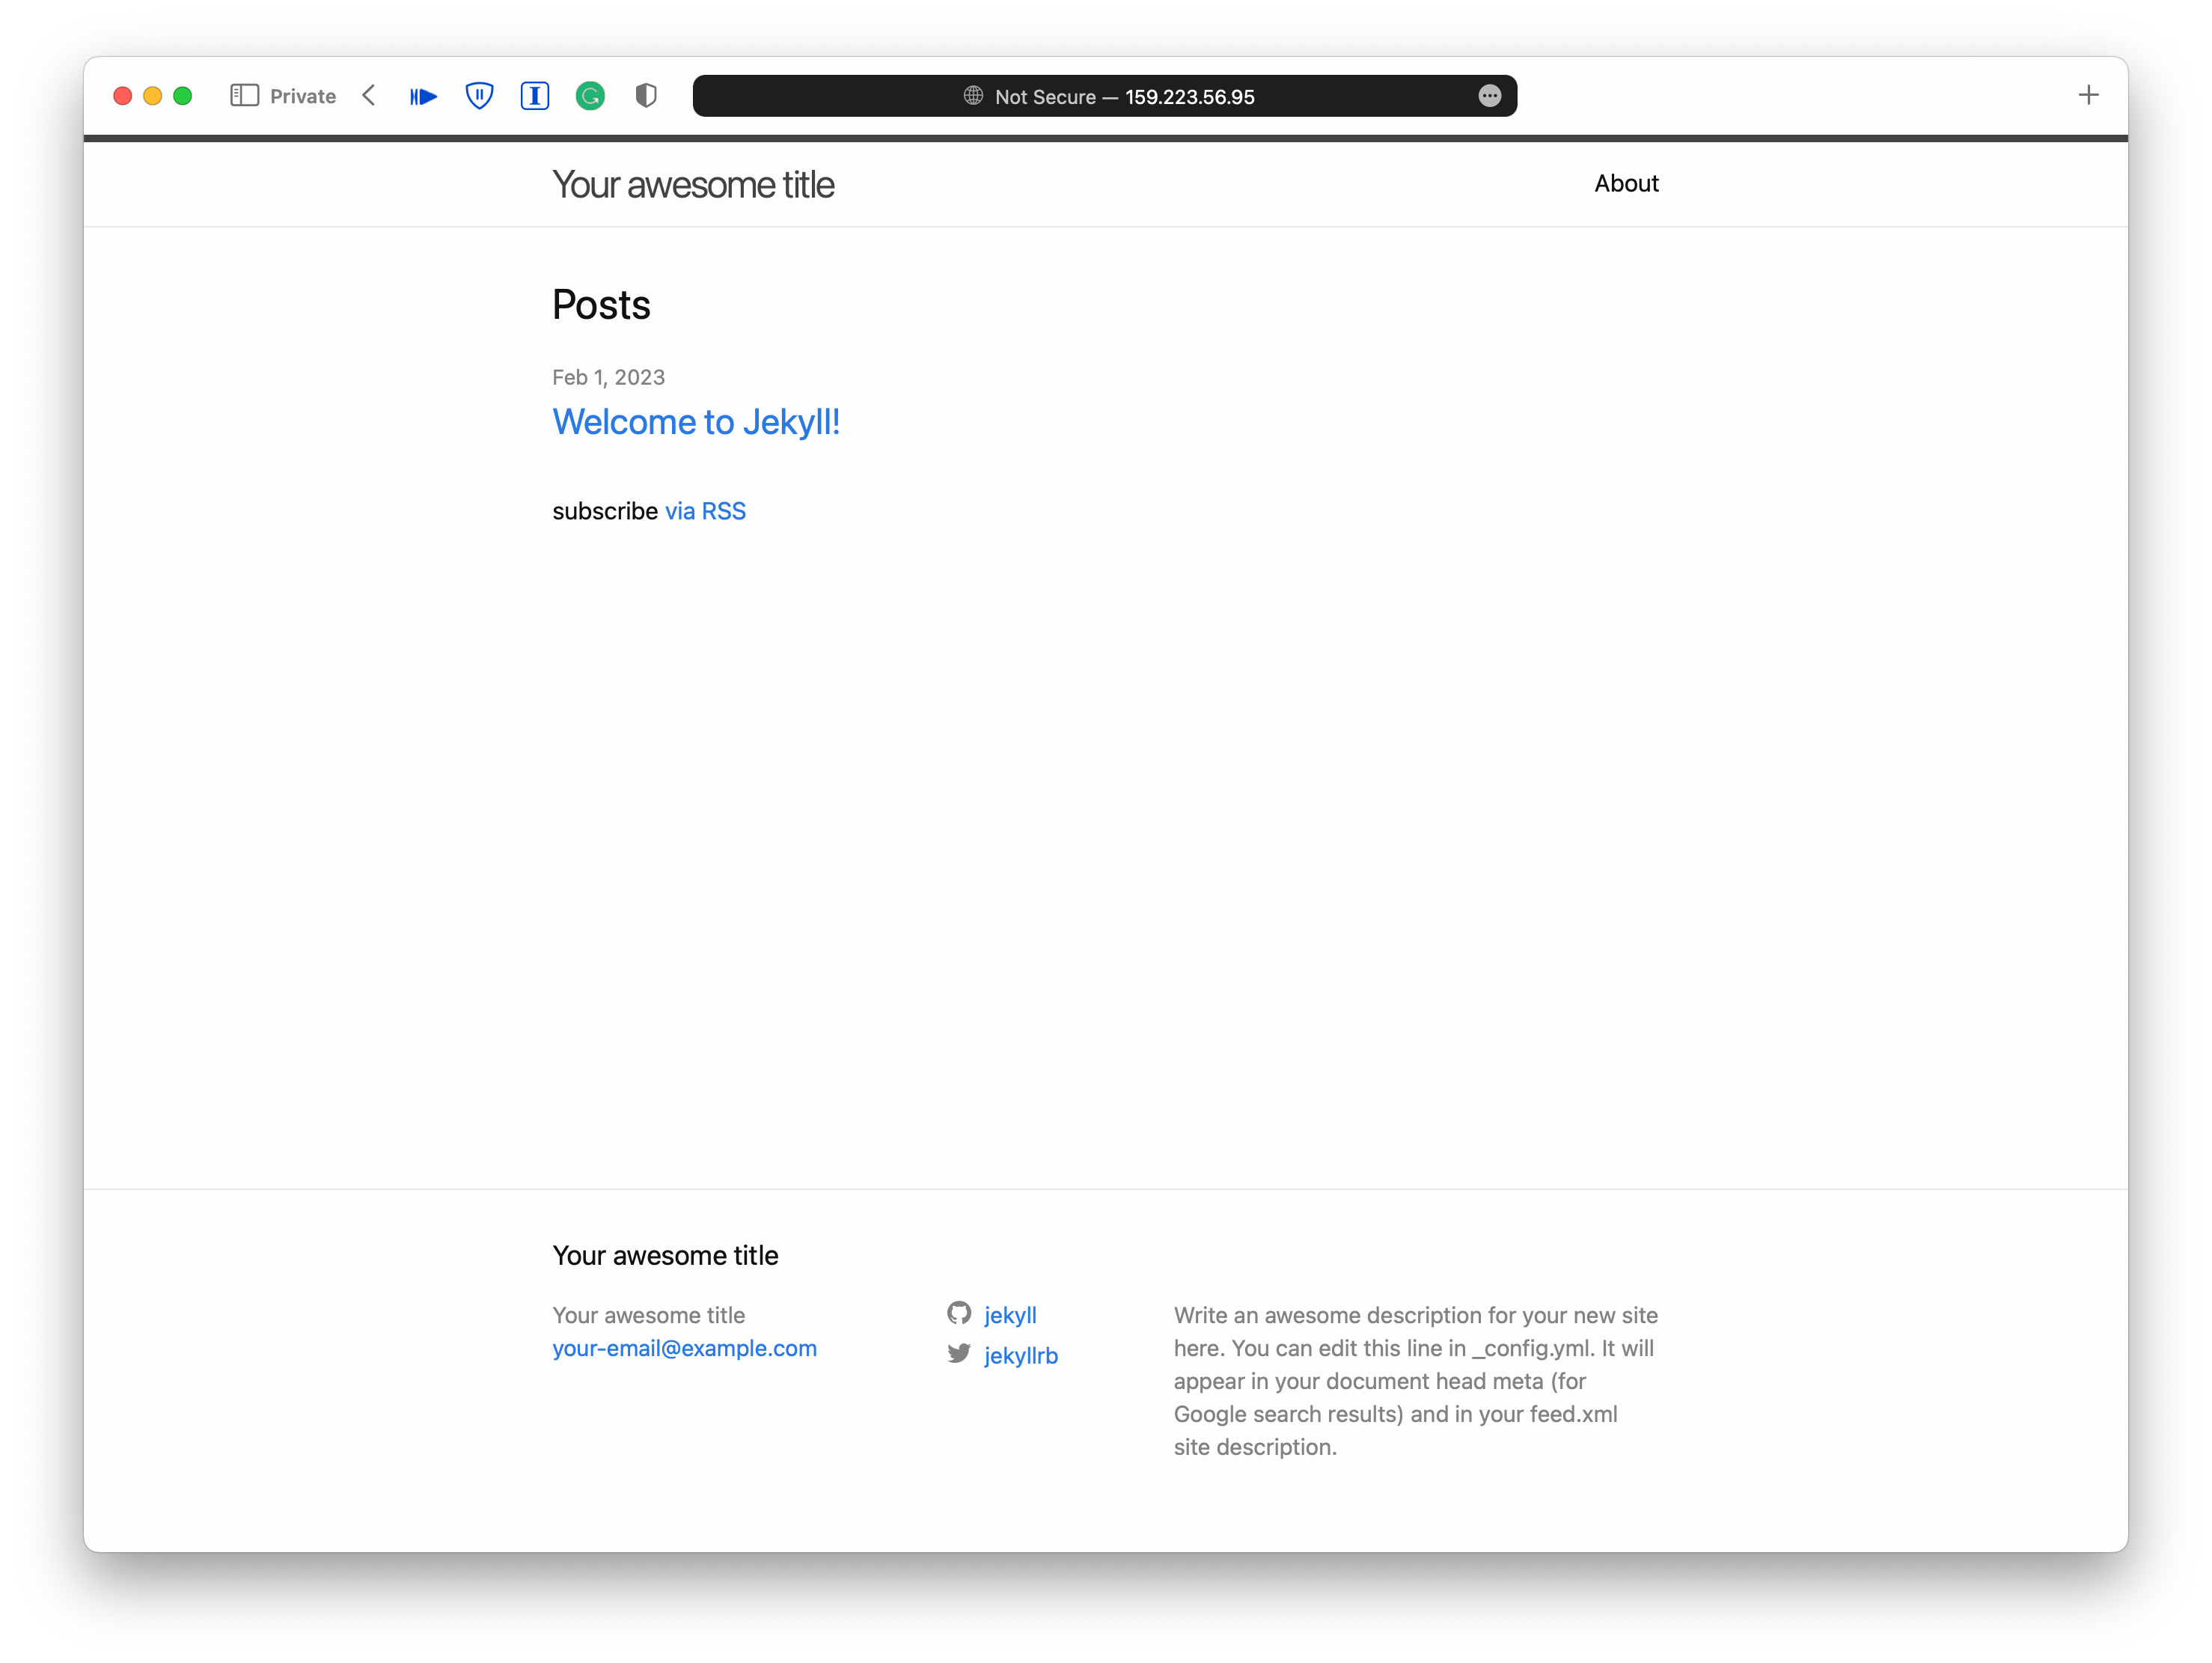
Then head to http://159.223.56.95:8080 or whatever IP address you got from
inletsctl above. Now that the blog has been exposed to the world in plain
HTTP.
Container Management
But that’s not enough. A single container is like a little boat in the ocean. Besides, there is much more than a single container to run to construct a secured and robust blog. We want the boats to be under a fleet’s control. We will put the container on a container management platform, under Kubernetes’ control. First, we need a container registry to distribute the image because the container will no longer just running in our development environment.
MetalLB
With that said, we need some auxiliary services to be ready before setting up the container registry. The first one is the load balancer controller. The vanilla Kubernetes does not come with a working implementation of LoadBalancer Services. Typically, this feature is fulfilled by public cloud service providers. However, MetalLB provides a way to enable LoadBalancer Services for on-prem Kubernetes installations. We need this because we’re going to access LoadBalancer Services of the container registry (and later, the reverse proxies, the Git server, and the Continuous Integration platform.)
To install MetalLB on Kubernetes via Helm:
$ helm upgrade --install metallb metallb \
    --create-namespace \
    --namespace=metallb-system \
    --repo https://metallb.github.io/metallb
To configure MetalLB, two types of custom resources need to be defined, one is IPAddressPool, and the other is L2Advertisement. Both of them are self-explanatory from their names.
$ cat > ipaddresspool.yaml <<EOF
apiVersion: metallb.io/v1beta1
kind: IPAddressPool
metadata:
  name: first-pool
  namespace: metallb-system
spec:
  addresses:
  - 192.168.48.240-192.168.48.250
EOF
$ kubectl apply -f l2advertisement.yaml
$ cat > l2advertisement.yaml <<EOF
apiVersion: metallb.io/v1beta1
kind: L2Advertisement
metadata:
  name: example
  namespace: metallb-system
EOF

$ kubectl apply -f l2advertisement.yaml
Ingress Nginx (Internal)
Ingress is another example that the vanilla Kubernetes has-defined but not-yet-implemented function. Ingress Nginx is an open-source Ingress controller implementation powered by Nginx. You can treat it as a layer 7 load balancer if that makes more sense to you.
We’re going to have two instances of the Ingress Nginx controller, one is for internal services, i.e., the container registry, the Git server, and the Continuous Integration platform, and the other is for the external service, which is the blog. The LoadBalancer Service of the internal one will retrieve an IP address from MetalLB. However, the external one will get one from a public cloud service provider. We’ll get into that later. Let’s focus on the internal one first.
$ helm upgrade --install ingress-nginx ingress-nginx \
    -f values.yaml \
    --create-namespace \
    --namespace ingress-nginx \
    --repo https://kubernetes.github.io/ingress-nginx
In values.yaml:
---
controller:
  ingressClassResource:
    name: nginx
    enabled: true
    default: true
    controllerValue: "k8s.io/ingress-nginx"
  ingressClass: nginx
  watchIngressWithoutClass: true
  publishService:
    enabled: true
  extraArgs:
    default-ssl-certificate: $(POD_NAMESPACE)/internal-tls
  service:
    annotations:
      metallb.universe.tf/allow-shared-ip: gateway
As you might notice there’s a internal-tls reference in the above, it’s the
default TLS certificate that secures the HTTP connections. Typically, we need to
specify a Secret that contains a TLS private key and certificate for each
Ingress resource that we want to secure. And the above default-ssl-certificate
is to make sure that any Ingress resource with TLS enabled but without
specifying a Secret can fall into this safety net. For the actual TLS private
key and certificate, I managed to get one by using a Let’s Encrypt installation
outside of the Kubernetes cluster because it’s a wildcard certificate and it’s a
little complicated to set up (DNS challenges) so I will not cover it here. If
you’re interested, maybe take a look at this article.
Container Registry
To push the image to remote, there must be a registry beforehand. You can leverage existing solutions like Docker Hub. I have a private registry with basic authentication and HTTPS enabled running in my Kubernetes cluster already.
$ docker run --rm --entrypoint htpasswd httpd:2 -Bbn admin password > ./htpasswd
$ helm upgrade --install private-registry docker-registry \
    --set secrets.htpasswd=$(cat ./htpasswd) \
    -f values.yaml \
    --create-namespace \
    --namespace registry \
    --repo https://helm.twun.io
The configuration of the private registry is in values.yaml:
---
persistence:
  enabled: false
ingress:
  enabled: true
  annotations:
    nginx.ingress.kubernetes.io/proxy-body-size: 1g
  tls:
  - hosts:
      - registry.internal.example.com
  hosts:
    - registry.internal.example.com
  path: /
With a valid container registry up and running, we can push the image onto it:
docker login -u admin -p password registry.internal.example.com
docker tag starbops/blog:v0.1.0 registry.internal.example.com/starbops/blog:v0.1.0
docker push registry.internal.example.com/starbops/blog:v0.1.0
The Docker registry server provides a set of APIs for users to interact with. We can check the existence of the blog image:
$ curl -u admin:password https://registry.internal.example.com/v2/_catalog
{"repositories":["starbops/blog"]}
Now we’re able to run the blog not just locally but everywhere (as long as the registry is network-reachable).
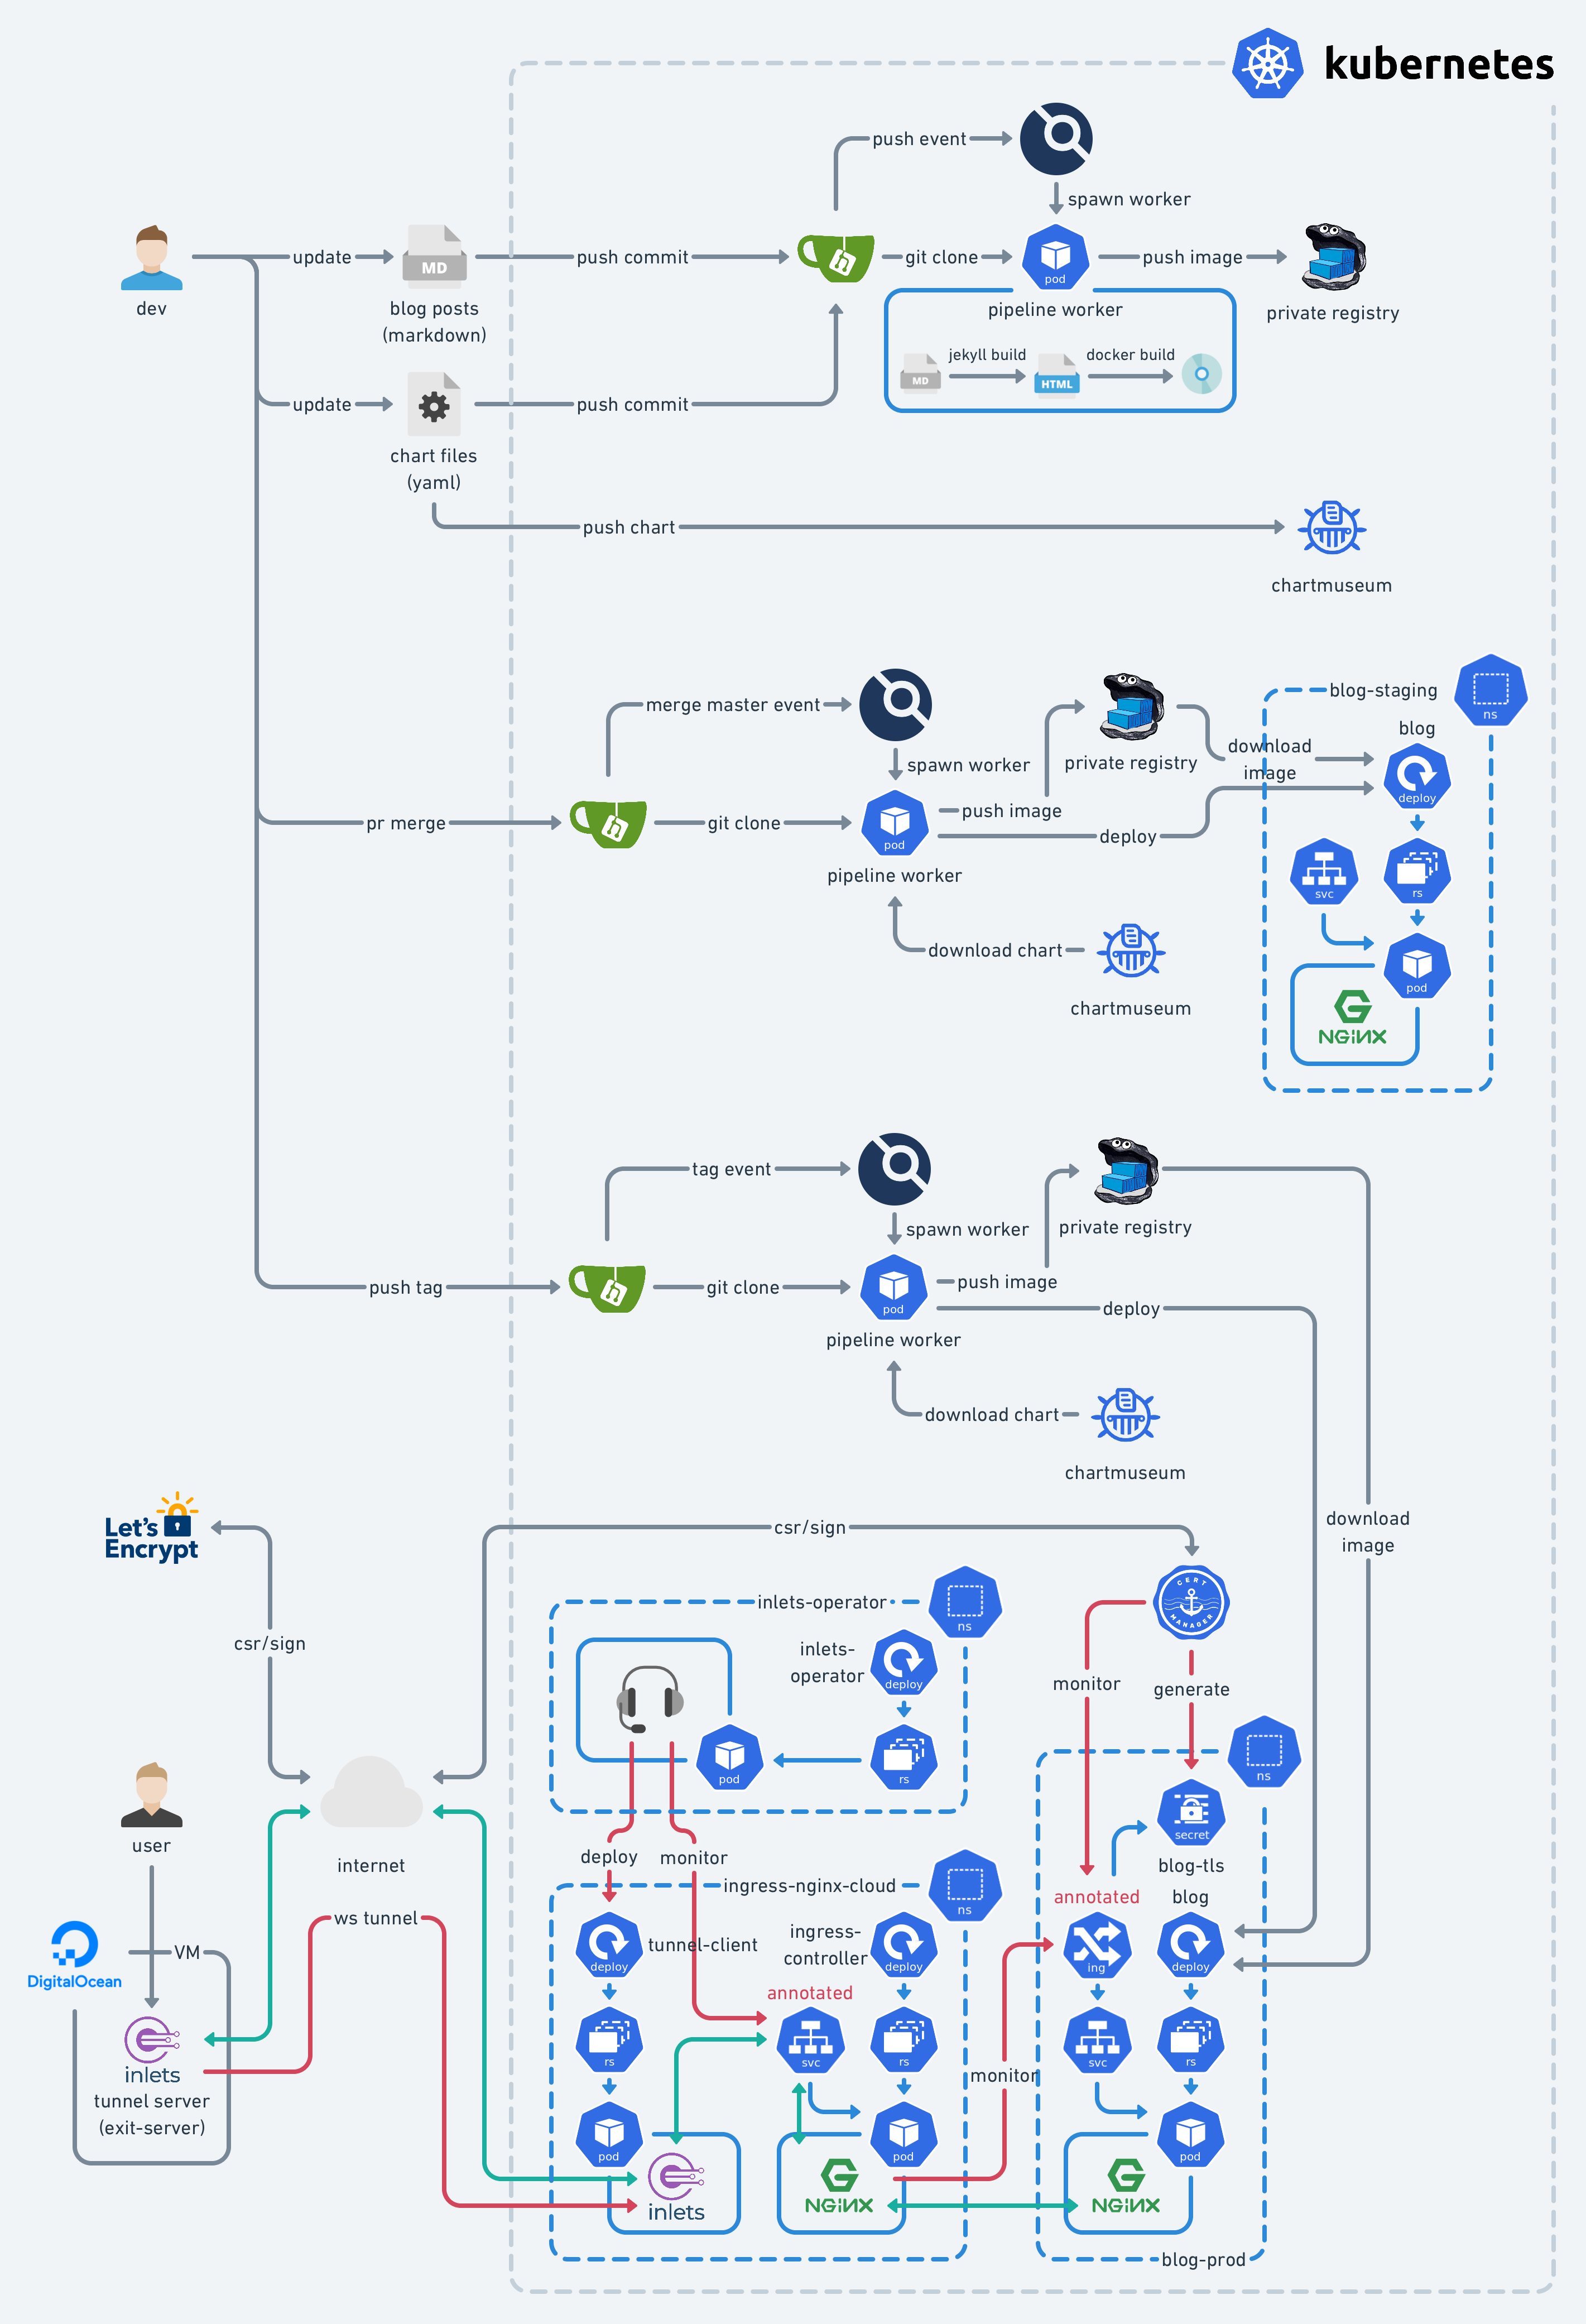
Running on Kubernetes
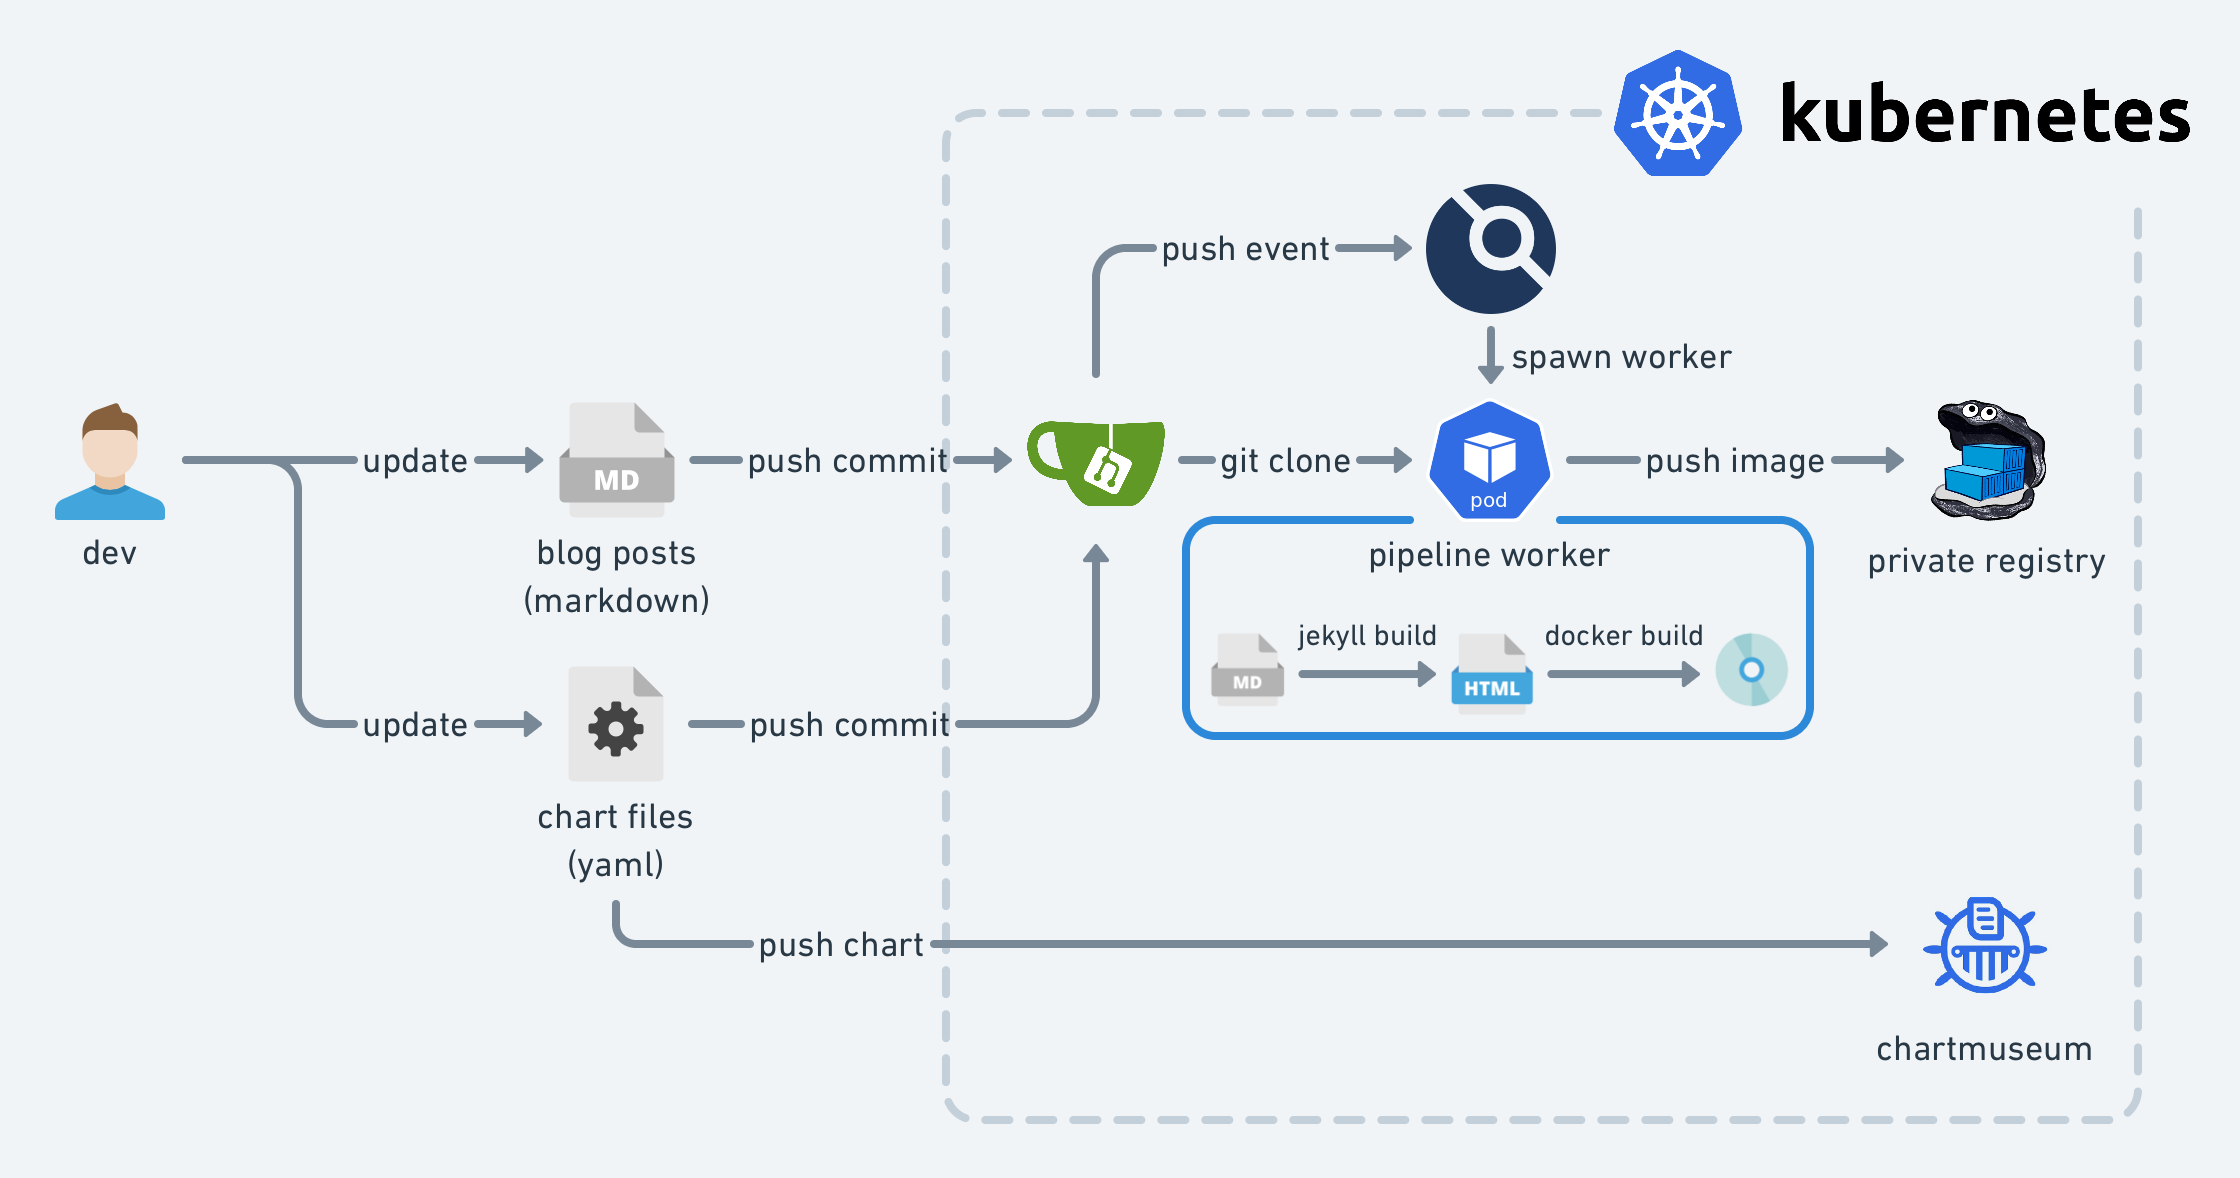
When the container registry is ready, we’re able to run the blog container in the Kubernetes cluster. We need to design the blueprint of the infrastructure first. This should look like the following diagram:
It’s time to prepare the manifests for it. It first comes with some plain YAML files for various Kubernetes resources. Basically, there are:
- Deployment: manages the blog Pod (the blog container will be inside the Pod)
- Secret: contains the credentials accessing the private container registry
- Service: provides a fixed L3/L4 endpoint for accessing the backend blog Pod
- Ingress: configures HTTPS endpoint for the blog
$ export REGISTRY="registry.internal.example.com"
$ cat <<EOF | tee deployment.yaml | kubectl apply -f -
apiVersion: apps/v1
kind: Deployment
metadata:
  name: blog
  namespace: blog
spec:
  replicas: 1
  selector:
    matchLabels:
      app: blog
  template:
    metadata:
      labels:
        app: blog
    spec:
      imagePullSecrets:
      - name: regcred
      containers:
      - image: $REGISTRY/starbops/blog:0.1.0
        name: blog
        ports:
        - containerPort: 80
          name: http
          protocol: TCP
EOF
$ kubectl create secret generic regcred \
    --from-file=.dockerconfigjson=$HOME/.docker/config.json \
    --type=kubernetes.io/dockerconfigjson \
    -o yaml --dry-run=client | tee secret.yaml | kubectl apply -f -
$ cat <<EOF | tee service.yaml | kubectl apply -f -
apiVersion: v1
kind: Service
metadata:
  name: blog
  namespace: blog
spec:
  ports:
  - name: http
    port: 80
    protocol: TCP
    targetPort: http
  selector:
    app: blog
  type: ClusterIP
EOF
The Ingress resource we’re going to create is designed to be associated with the
external-facing ingress-nginx, which is taken care of in the next section.
Notice that the ingressClassName is nginx-cloud but not nginx.
$ export DOMAIN="blog.example.com"
$ cat <<EOF | tee ingress.yaml | kubectl apply -f -
apiVersion: networking.k8s.io/v1
kind: Ingress
metadata:
  annotations:
    cert-manager.io/cluster-issuer: letsencrypt-staging-cloud
    kubernetes.io/ingress.class: nginx-cloud
  name: blog
  namespace: blog
spec:
  ingressClassName: nginx-cloud
  rules:
  - host: $DOMAIN
    http:
      paths:
      - backend:
          service:
            name: blog
            port:
              number: 80
        path: /
        pathType: Prefix
  tls:
  - hosts:
    - $DOMAIN
    secretName: blog-tls
EOF
After creating the Ingress resource, the blog is still not widely accessible from the Internet due to the absence of the inlets tunnel and the TLS certificate.
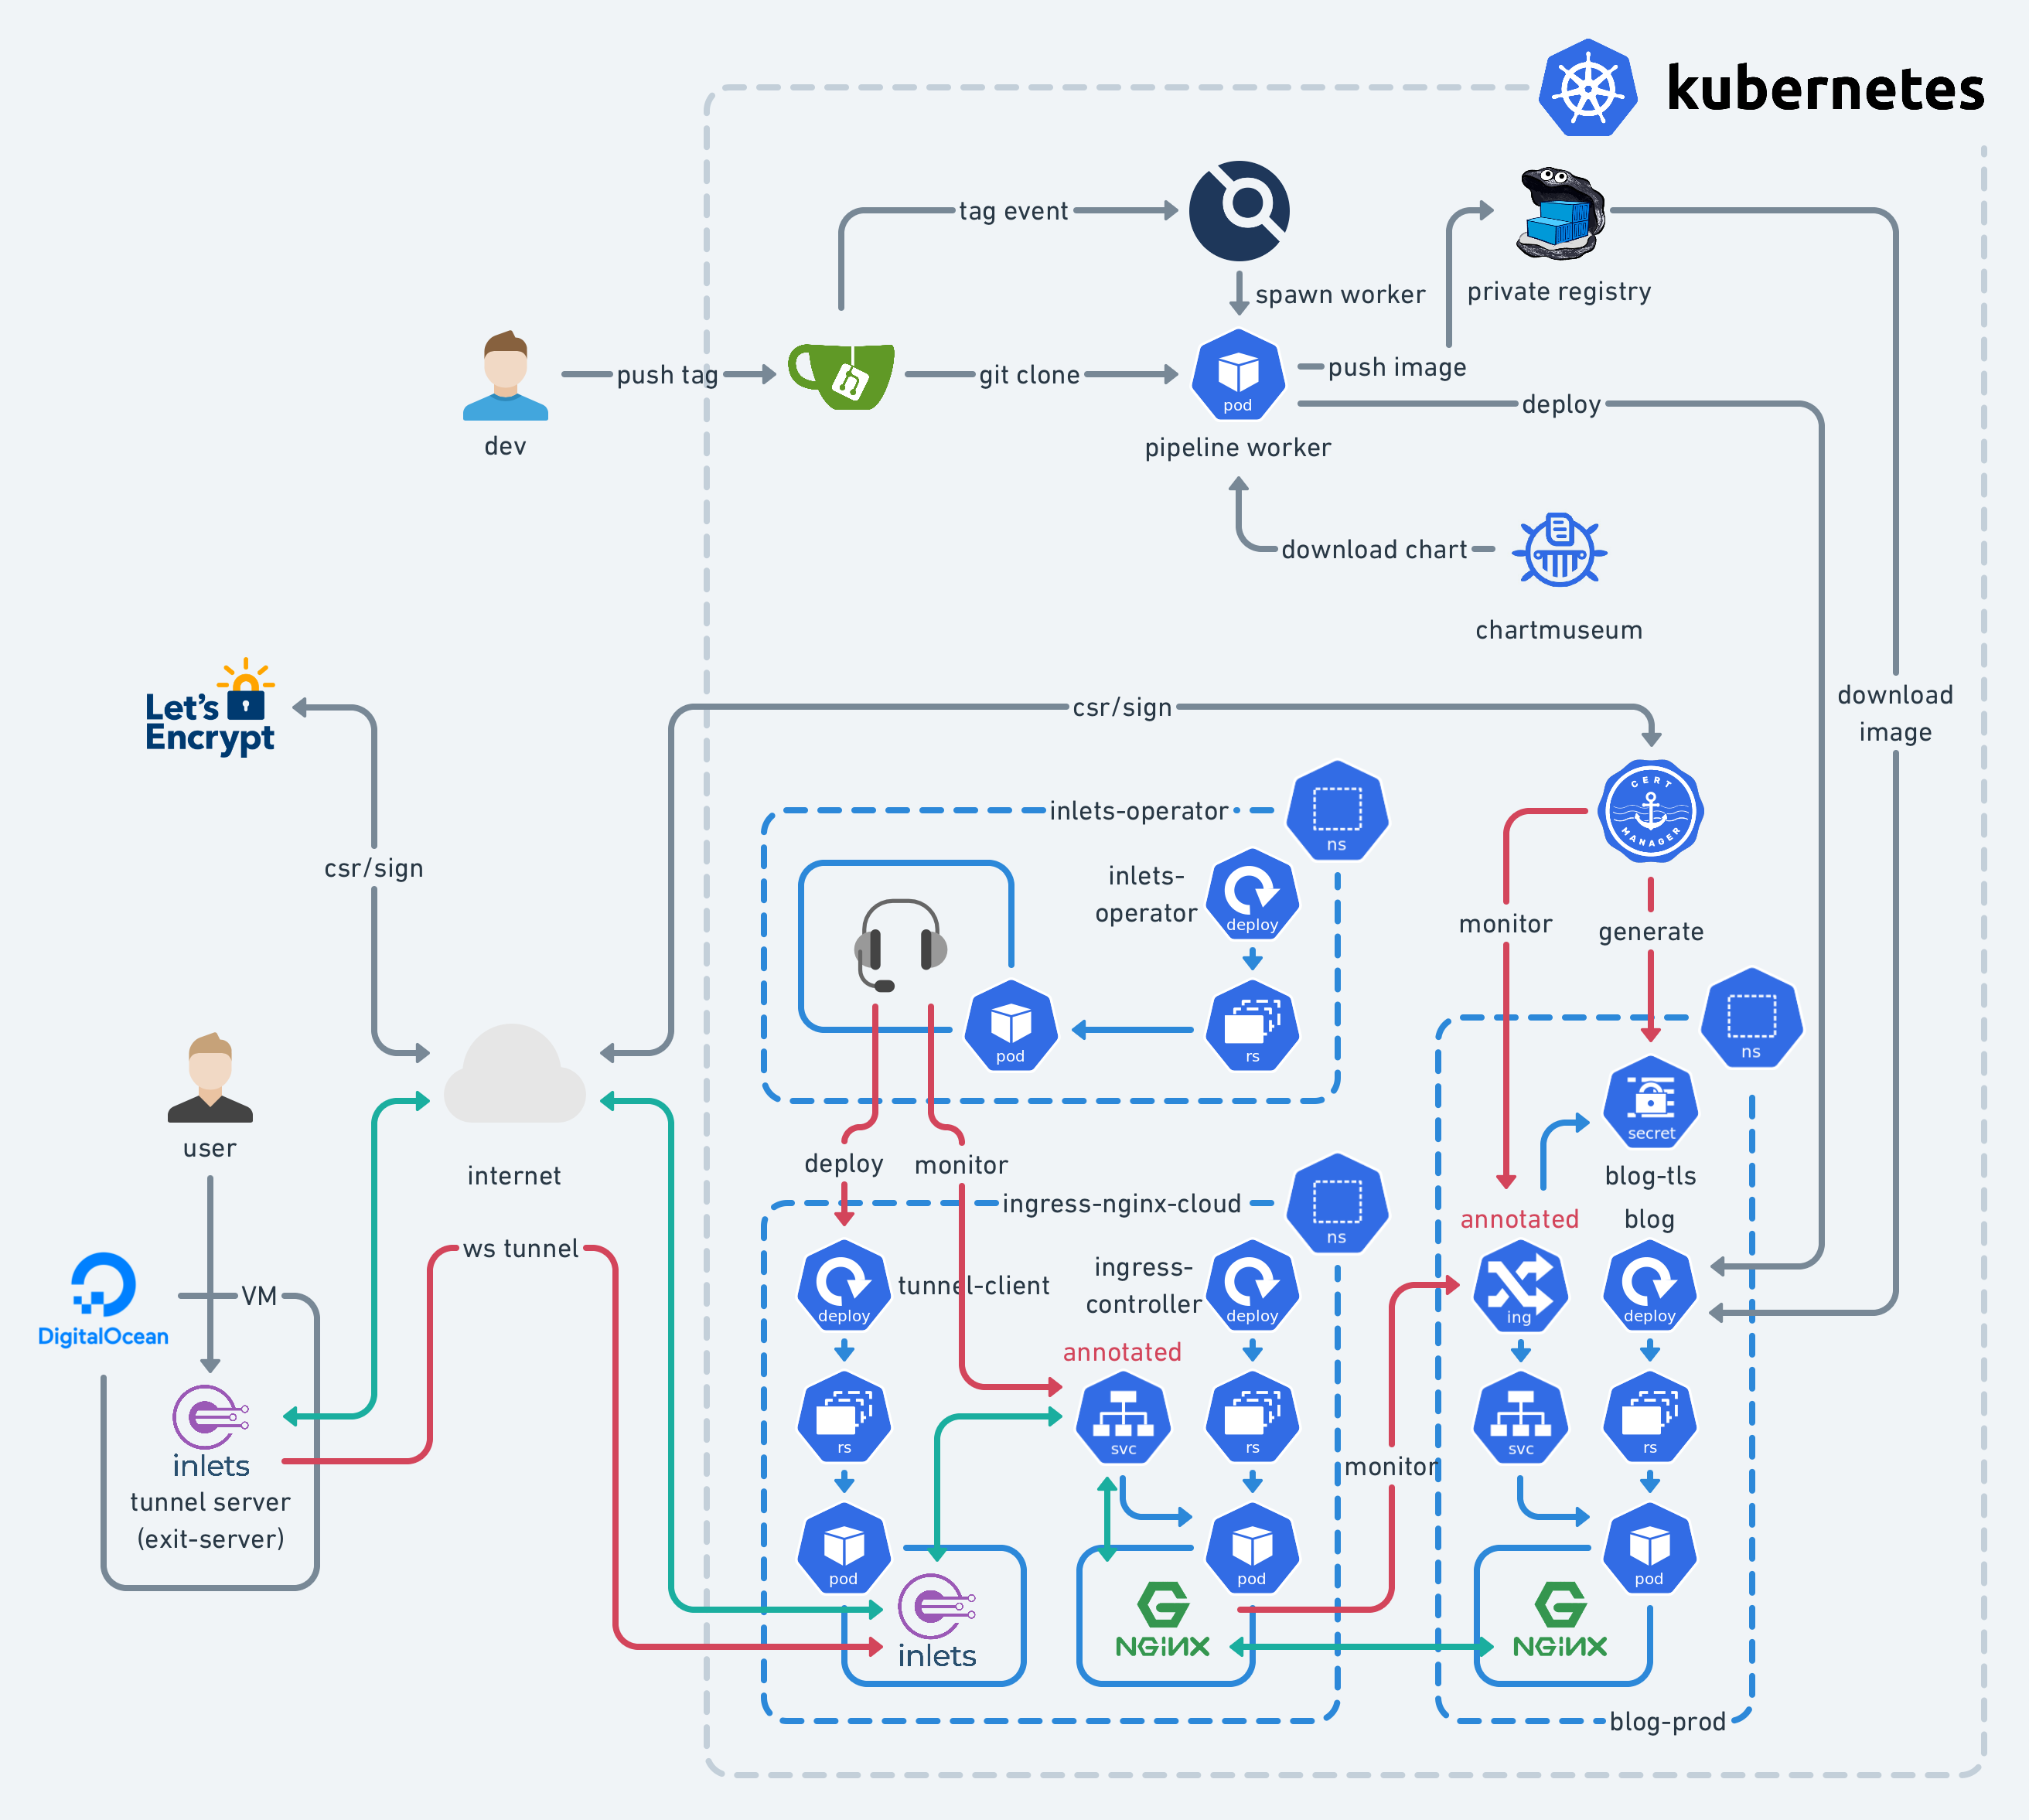
Inlets Operator
inlets-operator is yet another open-source project in the inlets ecosystem that reflects the merit of the cloud-native spirit. It brings your local Kubernetes to the public with ease. With inlets-operator installed, it will automatically provision inlets exit servers on the designated cloud service provider and establish tunnels for the LoadBalancer Services in the local Kubernetes cluster.
For advanced use cases like using MetalLB and inlets-operator at the same time, here has some explanation of it.
Here are the simple setup steps:
$ helm repo add inlets https://inlets.github.io/inlets-operator/
$ helm repo update
$ git clone https://github.com/inlets/inlets-operator.git
$ kubectl apply -f ./inlets-operator/artifacts/crds/
$ helm upgrade --install inlets-operator inlets/inlets-operator \
    --set provider=digitalocean \
    --set region=sgp1 \
    --set plan=s-1vcpu-512mb-10gb \
    --set inletsProLicense="$(cat $HOME/.inlets/LICENSE)" \
    --set annotatedOnly=true \
    --create-namespace \
    --namespace inlets-system
$ kubectl -n inlets-system create secret generic inlets-access-key \
    --from-literal inlets-access-key="$(cat $HOME/.inlets/do-access-token)"
In our setup, it is the Ingress controller’s Service that uses inlets-operator. So we’ll stop here and continue to the next component: ingress-nginx.
Ingress Nginx (External)
The Ingress Nginx controller is essential because we want to share our blog with the outside world with a memorizable domain name.
To install ingress-nginx in the Kubernetes cluster is fairly simple:
$ helm upgrade --install ingress-nginx-cloud ingress-nginx \
    -f values.yaml \
    --create-namespace \
    --namespace ingress-nginx-cloud \
    --repo https://kubernetes.github.io/ingress-nginx
We need to distinguish this external-facing ingress-nginx from the internal-facing ingress-nginx we’re going to install in the later chapter.
---
controller:
  ingressClassResource:
    name: nginx-cloud
    enabled: true
    default: false
    controllerValue: "k8s.io/ingress-nginx-cloud"
  ingressClass: nginx-cloud
  publishService:
    enabled: true
  service:
    annotations:
      metallb.universe.tf/address-pool: "dummy"
      dev.inlets.manage: "true"
After the external-facing ingress-nginx is installed, we can observe that the corresponding inlets exit server and tunnel are provisioned.

$ kubectl -n ingress-nginx-cloud get svc,tunnels
NAME                                               TYPE           CLUSTER-IP      EXTERNAL-IP      PORT(S)                      AGE
service/ingress-nginx-cloud-controller             LoadBalancer   10.53.234.28    165.22.101.142   80:30388/TCP,443:32421/TCP   5h21m
service/ingress-nginx-cloud-controller-admission   ClusterIP      10.53.205.209   <none>           443/TCP                      5h21m

NAME                                                             SERVICE                          TUNNEL   HOSTSTATUS   HOSTIP           HOSTID
tunnel.inlets.inlets.dev/ingress-nginx-cloud-controller-tunnel   ingress-nginx-cloud-controller            active       165.22.101.142   338744799
Cert Manager
We will need cert-manager to get a valid certificate for the blog and also help us handle the certificate-related procedure like issuer management, certificate signing request generation, challenge responding, etc. It’s quite easy to deploy in a Kubernetes cluster:
$ helm upgrade --install cert-manager cert-manager \
  --set installCRDs=true \
  --version v1.11.0 \
  --create-namespace \
  --namespace cert-manager \
  --repo https://charts.jetstack.io
Set up a ClusterIssuer for later use. Due to the strict rate limit of production usage set by Let’s Encrypt, we’ll stick to the staging server for demonstration. Once the configuration is settled, we can replace it with the production one. Make sure the email address is valid.
$ export EMAIL="admin@example.com"
$ cat > staging-issuer-cloud.yaml <<EOF
apiVersion: cert-manager.io/v1
kind: ClusterIssuer
metadata:
  name: letsencrypt-staging-cloud
spec:
  acme:
    # The ACME server URL
    server: https://acme-staging-v02.api.letsencrypt.org/directory
    # Email address used for ACME registration
    email: $EMAIL
    # Name of a secret used to store the ACME account private key
    privateKeySecretRef:
      name: letsencrypt-staging-cloud
    # Enable the HTTP-01 challenge provider
    solvers:
    - http01:
        ingress:
          class: nginx-cloud
EOF

$ kubectl apply -f staging-issuer-cloud.yaml
Helm Charts
Remember that we created several manifest files for the blog to run on the Kubernetes cluster?
kubectl apply -f deployment.yaml -f service.yaml -f ingress.yaml
Having these manifest files at hand is very helpful to further devise the Helm chart template.
$ tree .
.
├── blog-0.1.0.tgz
├── charts
├── Chart.yaml
├── README.md
├── templates
│   ├── certificate.yaml
│   ├── deployment.yaml
│   ├── _helpers.tpl
│   ├── hpa.yaml
│   ├── ingress.yaml
│   ├── NOTES.txt
│   ├── serviceaccount.yaml
│   ├── service.yaml
│   └── tests
│       └── test-connection.yaml
└── values.yaml

3 directories, 13 files
helm package .
curl --data-binary "@blog-0.1.0.tgz" https://charts.internal.example.com/api/charts
helm upgrade --install blog blog \
    -f values.yaml \
    --create-namespace \
    --namespace blog \
    --repo https://charts.internal.example.com/charts
kubectl -n blog logs deploy/blog -f
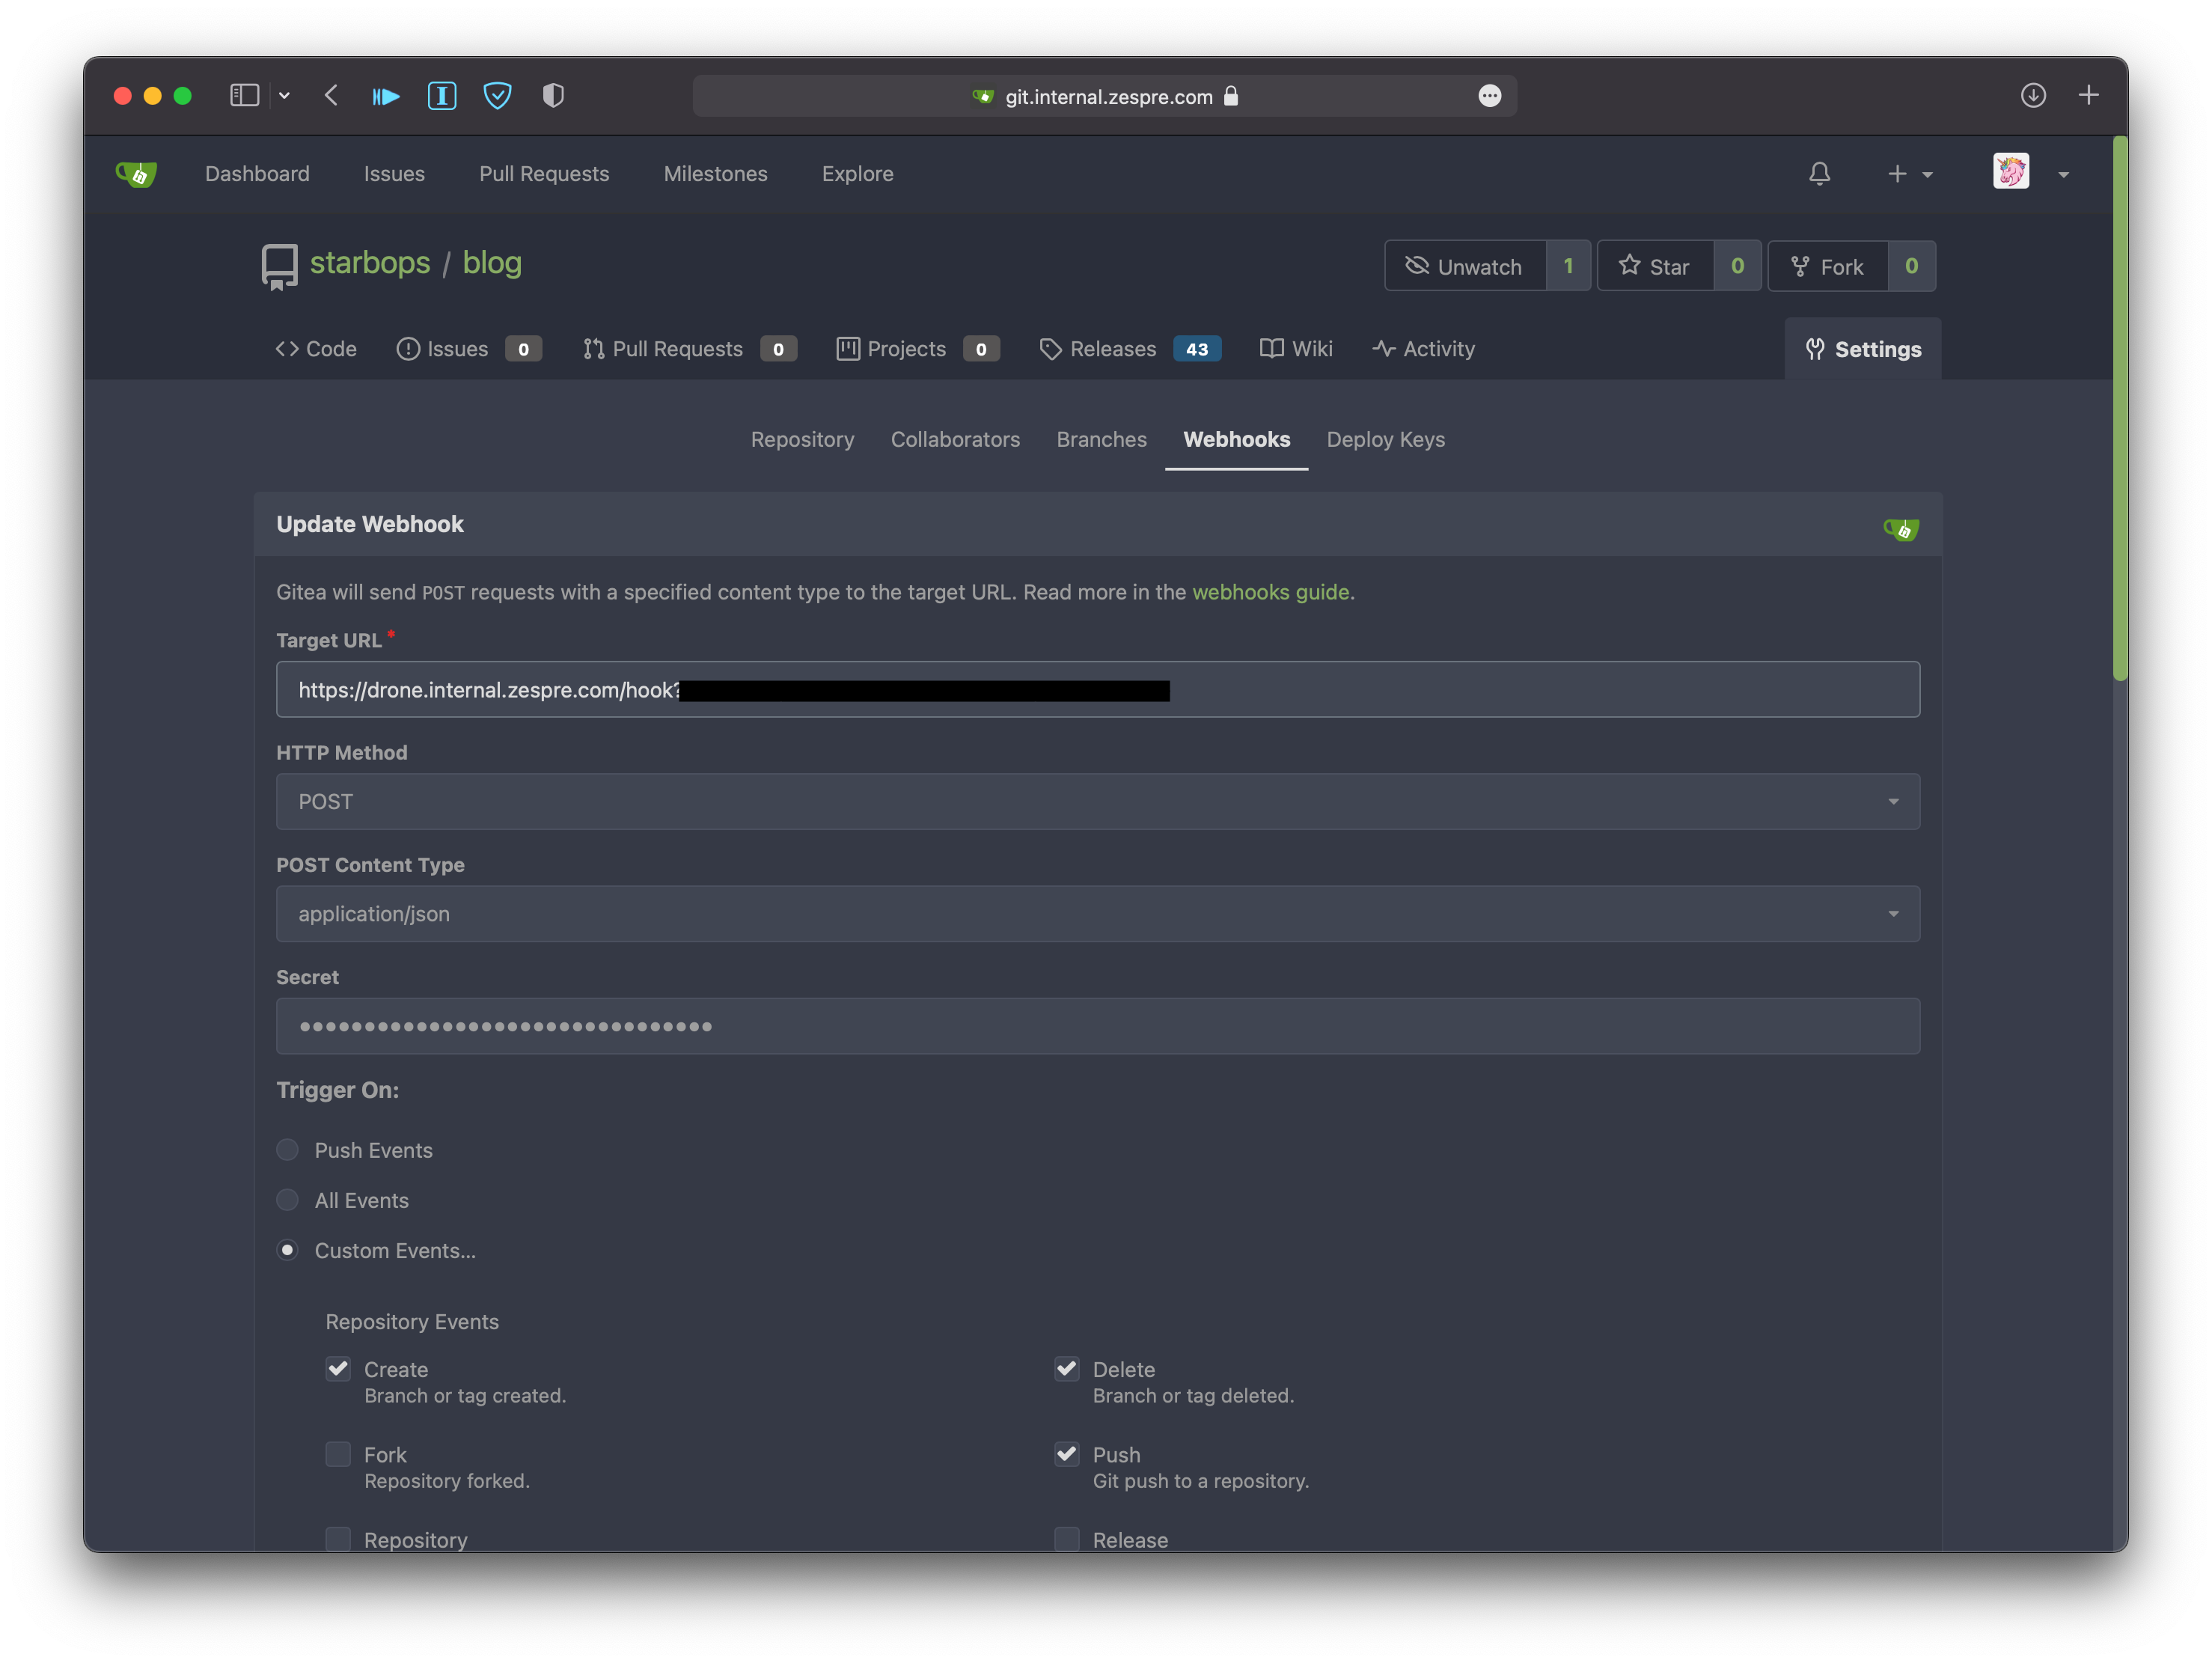
GitOps
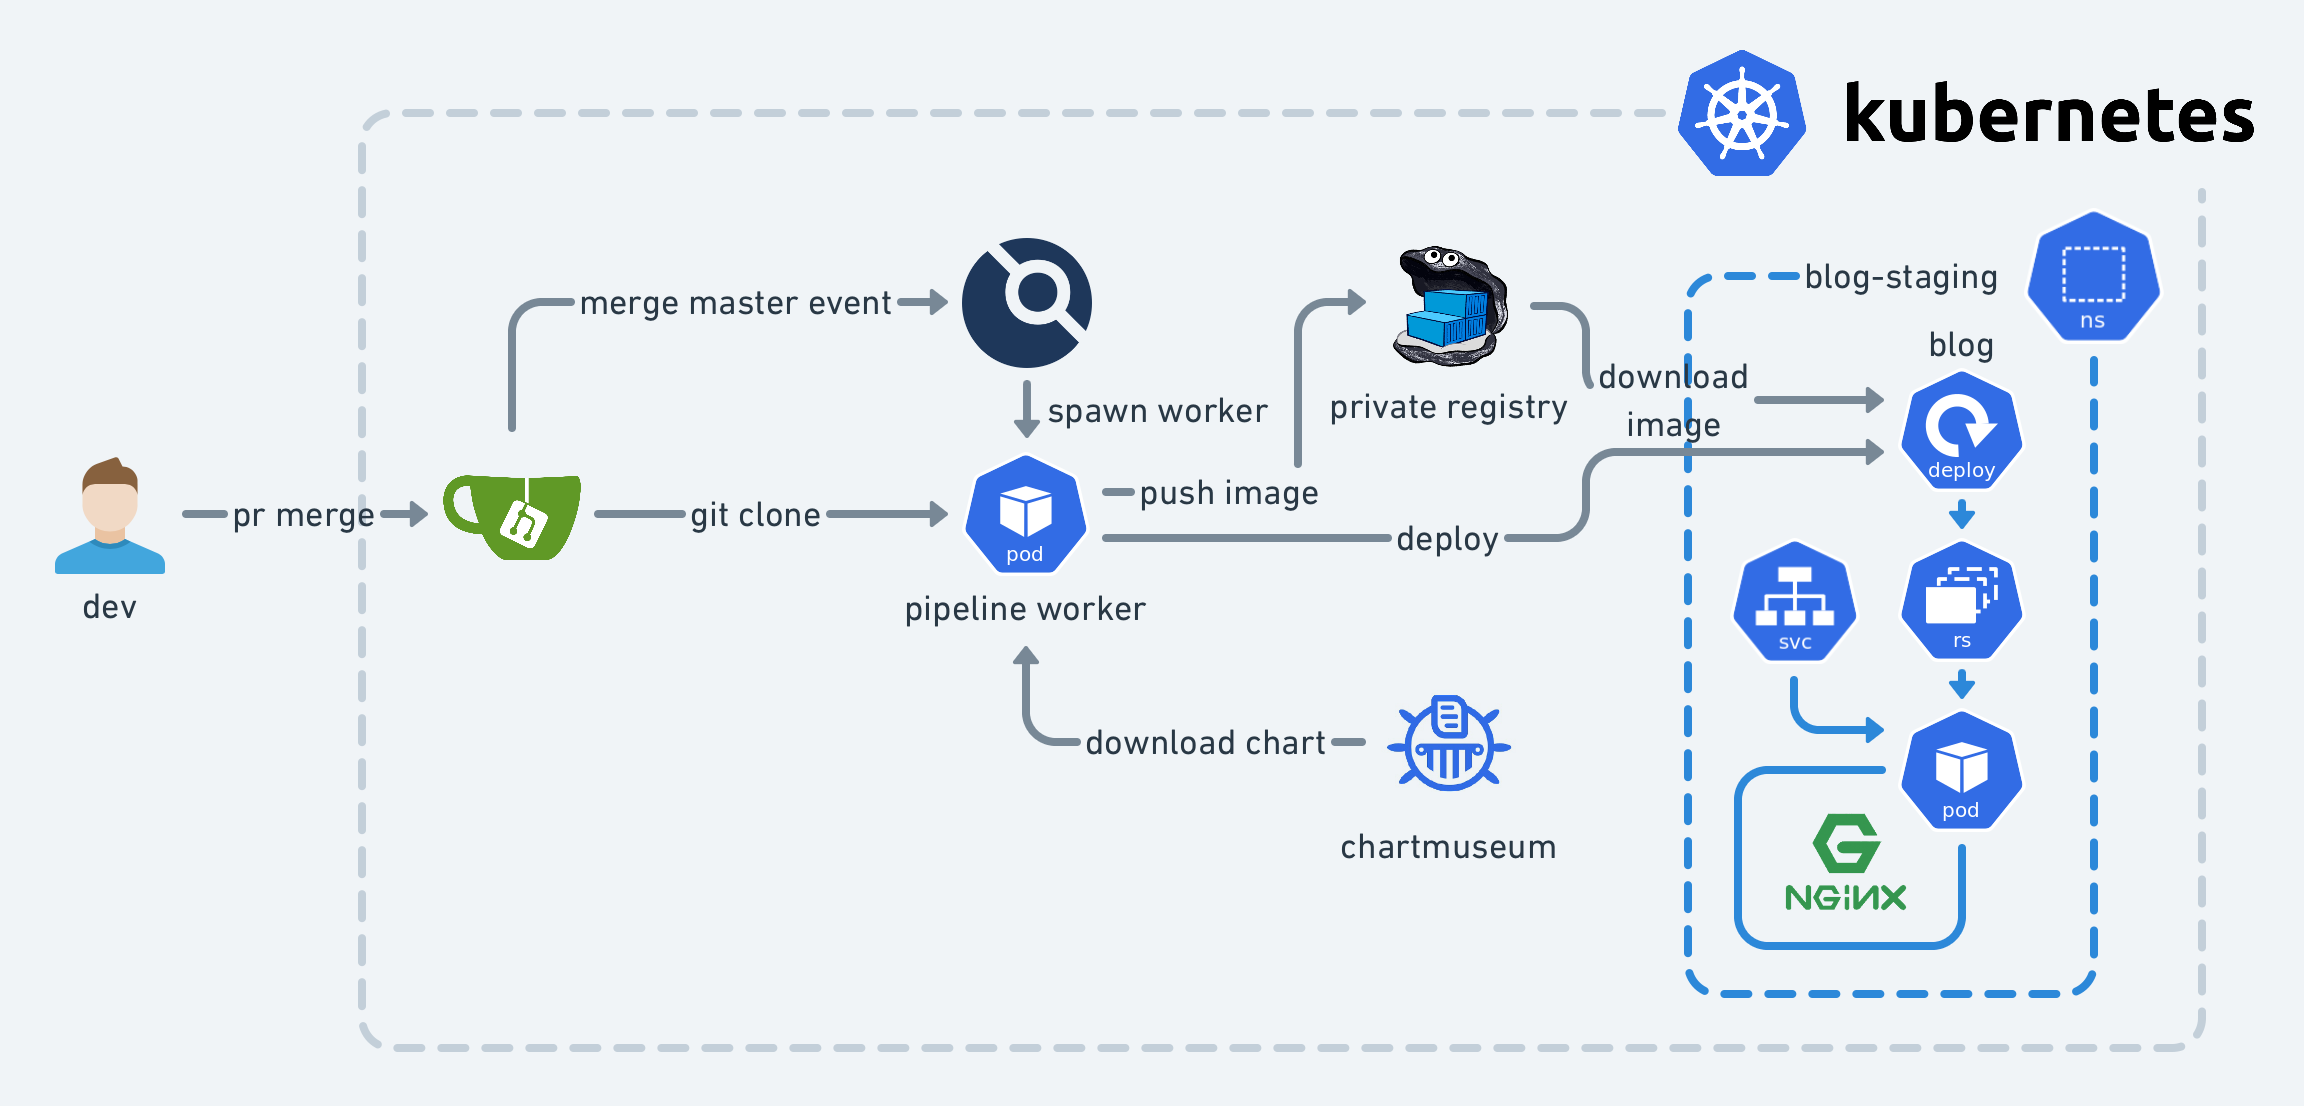
Now that the version-control and syntax-checking parts are done, it’s time for the last part - auto-publishing. What I want is actually:
- When new commits are pushed
- Check syntax
- Build the source of the blog
- Package the blog in HTML into a container image
- Upload the container image to the registry
- When PRs are merged
- Do the steps mentioned above
- Deploy the blog to the staging environment
- When release tags are pushed
- Do the steps mentioned above
- Deploy the blog to the production environment
Long story short, I’d like to apply the continuous integration/delivery/deployment practices to the blogging flow same as we do with software development.
Git Service
We need a git service to store the git repo. Here I choose Gitea and self-host it on my Kubernetes cluster.
$ helm upgrade --install gitea gitea \
    -f values.yaml \
    --create-namespace\
    --namespace gitea \
    --repo https://dl.gitea.io/charts/
It’s better to have persistent storage configured so the data won’t get lost
after restart. I also have a bunch of settings in values.yaml which you might
not need, but you can take a peek for references:
---
global:
  storageClass: longhorn
persistence:
  storageClass: longhorn
service:
  ssh:
    type: LoadBalancer
    annotations:
      metallb.universe.tf/allow-shared-ip: gateway
ingress:
  enabled: true
  annotations:
    nginx.ingress.kubernetes.io/proxy-body-size: 50m
  hosts:
  - git.internal.example.com
  tls:
  - hosts:
    - git.internal.example.com
gitea:
  admin:
    username: <redacted>
    password: <redacted>
    email: admin@example.com
  config:
    server:
      PROTOCOL: http
      ROOT_URL: https://git.internal.example.com
  database:
    builtIn:
      postgresql:
        enabled: false
      mariadb:
        enabled: true
  ldap:
    enabled: true
    name: ldap
    securityProtocol: starttls
    host: ldap.internal.example.com
    port: 389
    userSearchBase: "ou=people,dc=internal,dc=example,dc=com"
    userFilter: "(&(objectClass=posixAccount)(uid=%s))"
    emailAttribute: mail
    usernameAttribute: uid
    publicSshKeyAttribute: sshPublicKey
As you can see I set up the git service with L3 and L4 load balancers: MetalLB and L7 load balancer: ingress-nginx. The former provides an endpoint for SSH accessing like pushing changes to the git service; the latter is for HTTP(S) accessing like web browsing and cloning public repos.
It’s better to have TLS enabled, too. You can use cert-manager in the Kubernetes
cluster and fill up the corresponding tls sections above to enable HTTPS for
the git service with the aid of cert-manager. However, I’m not going to expose
the git service on the Internet for security concerns therefore cert-manager is
not applicable in my case. I choose an alternative way to enable HTTPS for the
git service: getting a valid wildcard certificate from the other Let’s Encrypt
installation (with DNS challenges) and setting up the default SSL certificate
config for the ingress-nginx so that any TLS-enabled Ingress resources without a
respective Secret resource specified will fall into this safety net. Here are
the example values.yaml when installing ingress-nginx with Helm:
---
controller:
  ingressClassResource:
    name: nginx
    enabled: true
    default: true
    controllerValue: "k8s.io/ingress-nginx"
  ingressClass: nginx
  watchIngressWithoutClass: true
  publishService:
    enabled: true
  extraArgs:
    default-ssl-certificate: $(POD_NAMESPACE)/internal-tls
  service:
    annotations:
      metallb.universe.tf/allow-shared-ip: gateway
Needless to say, the internal-tls Secret must be provided in the same
namespace with ingress-nginx. I’ll just leave that part to you to save the
space.
Also, the LDAP section above is to integrate with my existing identity service in my home lab. You can omit it if you don’t want to use it.
One point worth mentioning is that I realized Longhorn outperforms NFS in my scenario, in which all the Kubernetes nodes and the NFS server are VMs running on the same bare-metal server. I used to go with nfs-subdir-external-provisioner in the beginning, since it’s much easier to set up. But soon after, I encountered performance issues when executing CI jobs. So I turned to Longhorn, and it did not fail me.
Now I can write articles, commit changes, and push them to the Git server.
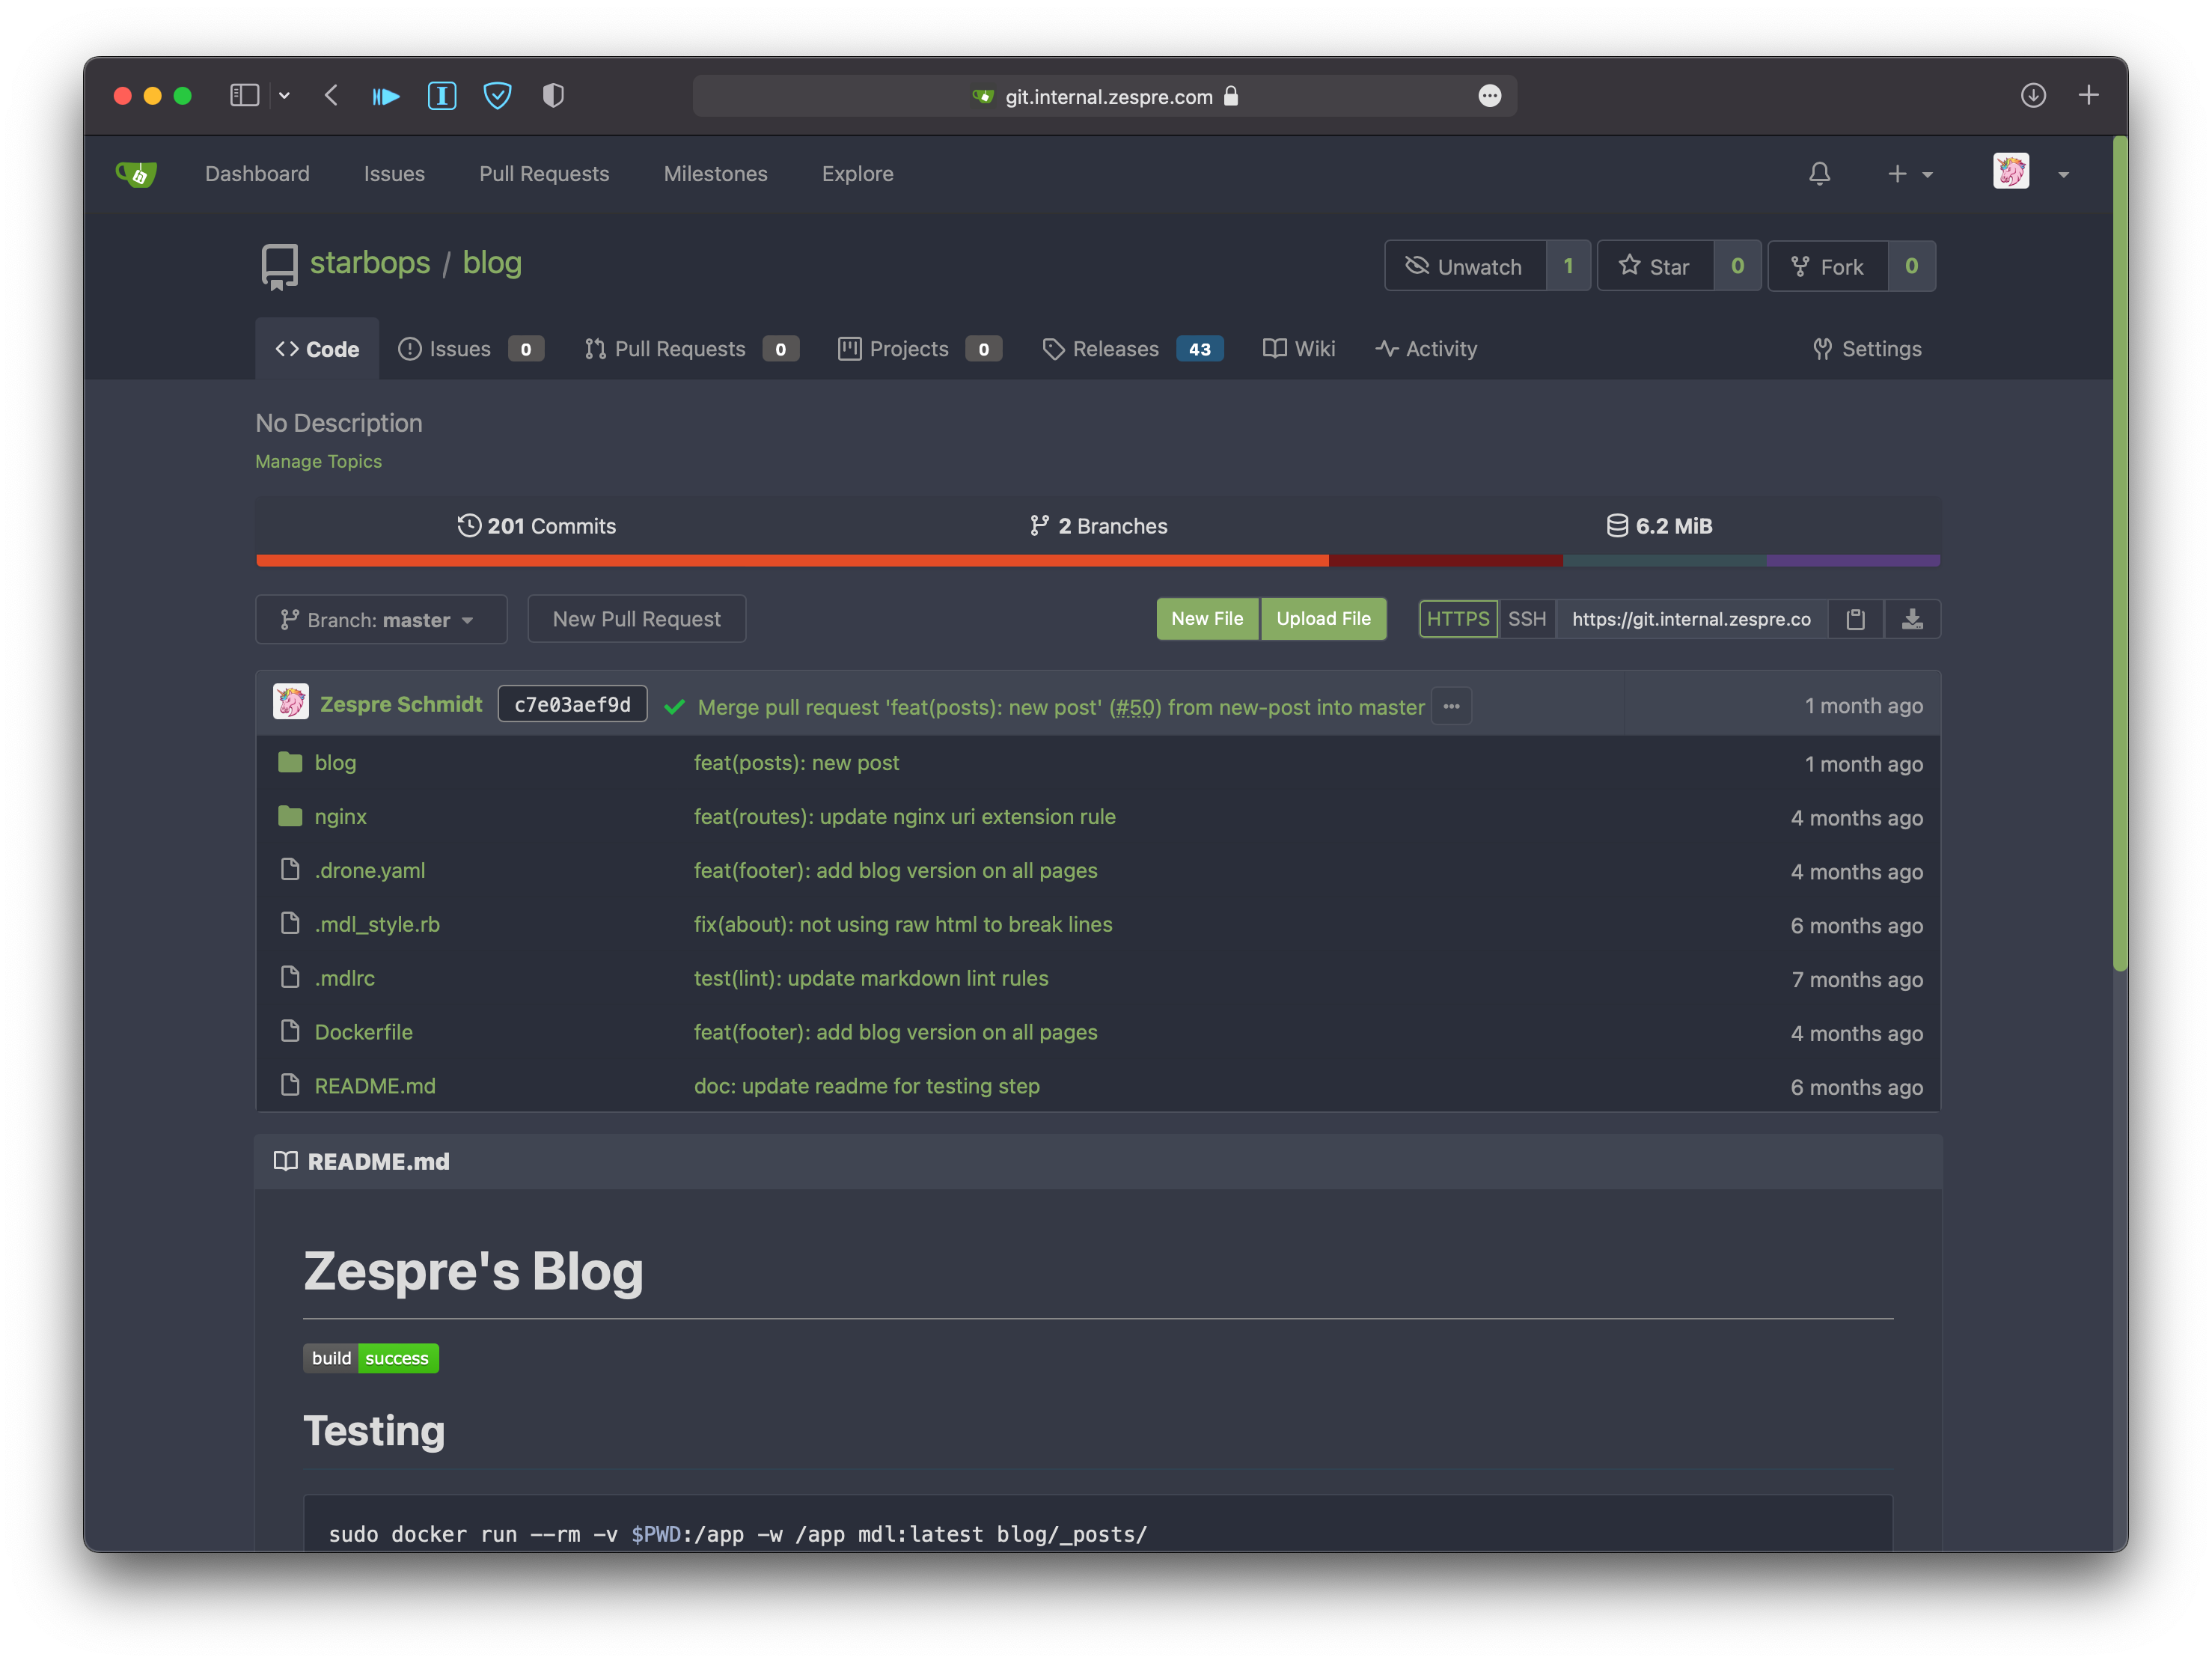
Chart Repository
ChartMuseum is an open-source Helm Chart repository server that supports many cloud storage backends. We will install ChartMuseum on the Kubernetes cluster to host the blog’s chart from a local filesystem.
helm upgrade --install chartmuseum chartmuseum \
    -f values.yaml
    --create-namespace \
    --namespace chartmuseum \
    --repo https://chartmuseum.github.io/charts
In values.yaml:
---
env:
  open:
    STORAGE: local
    DISABLE_API: false
persistence:
  enabled: true
  accessMode: ReadWriteOnce
  size: 8Gi
  storageClass: nfs-client
ingress:
  enabled: true
  ingressClassName: nginx
  hosts:
  - name: charts.internal.example.com
    path: /
    tls: true
cd blog-chart/
helm package .
curl --data-binary "@blog-0.1.0.tgz" https://charts.internal.example.com/api/charts
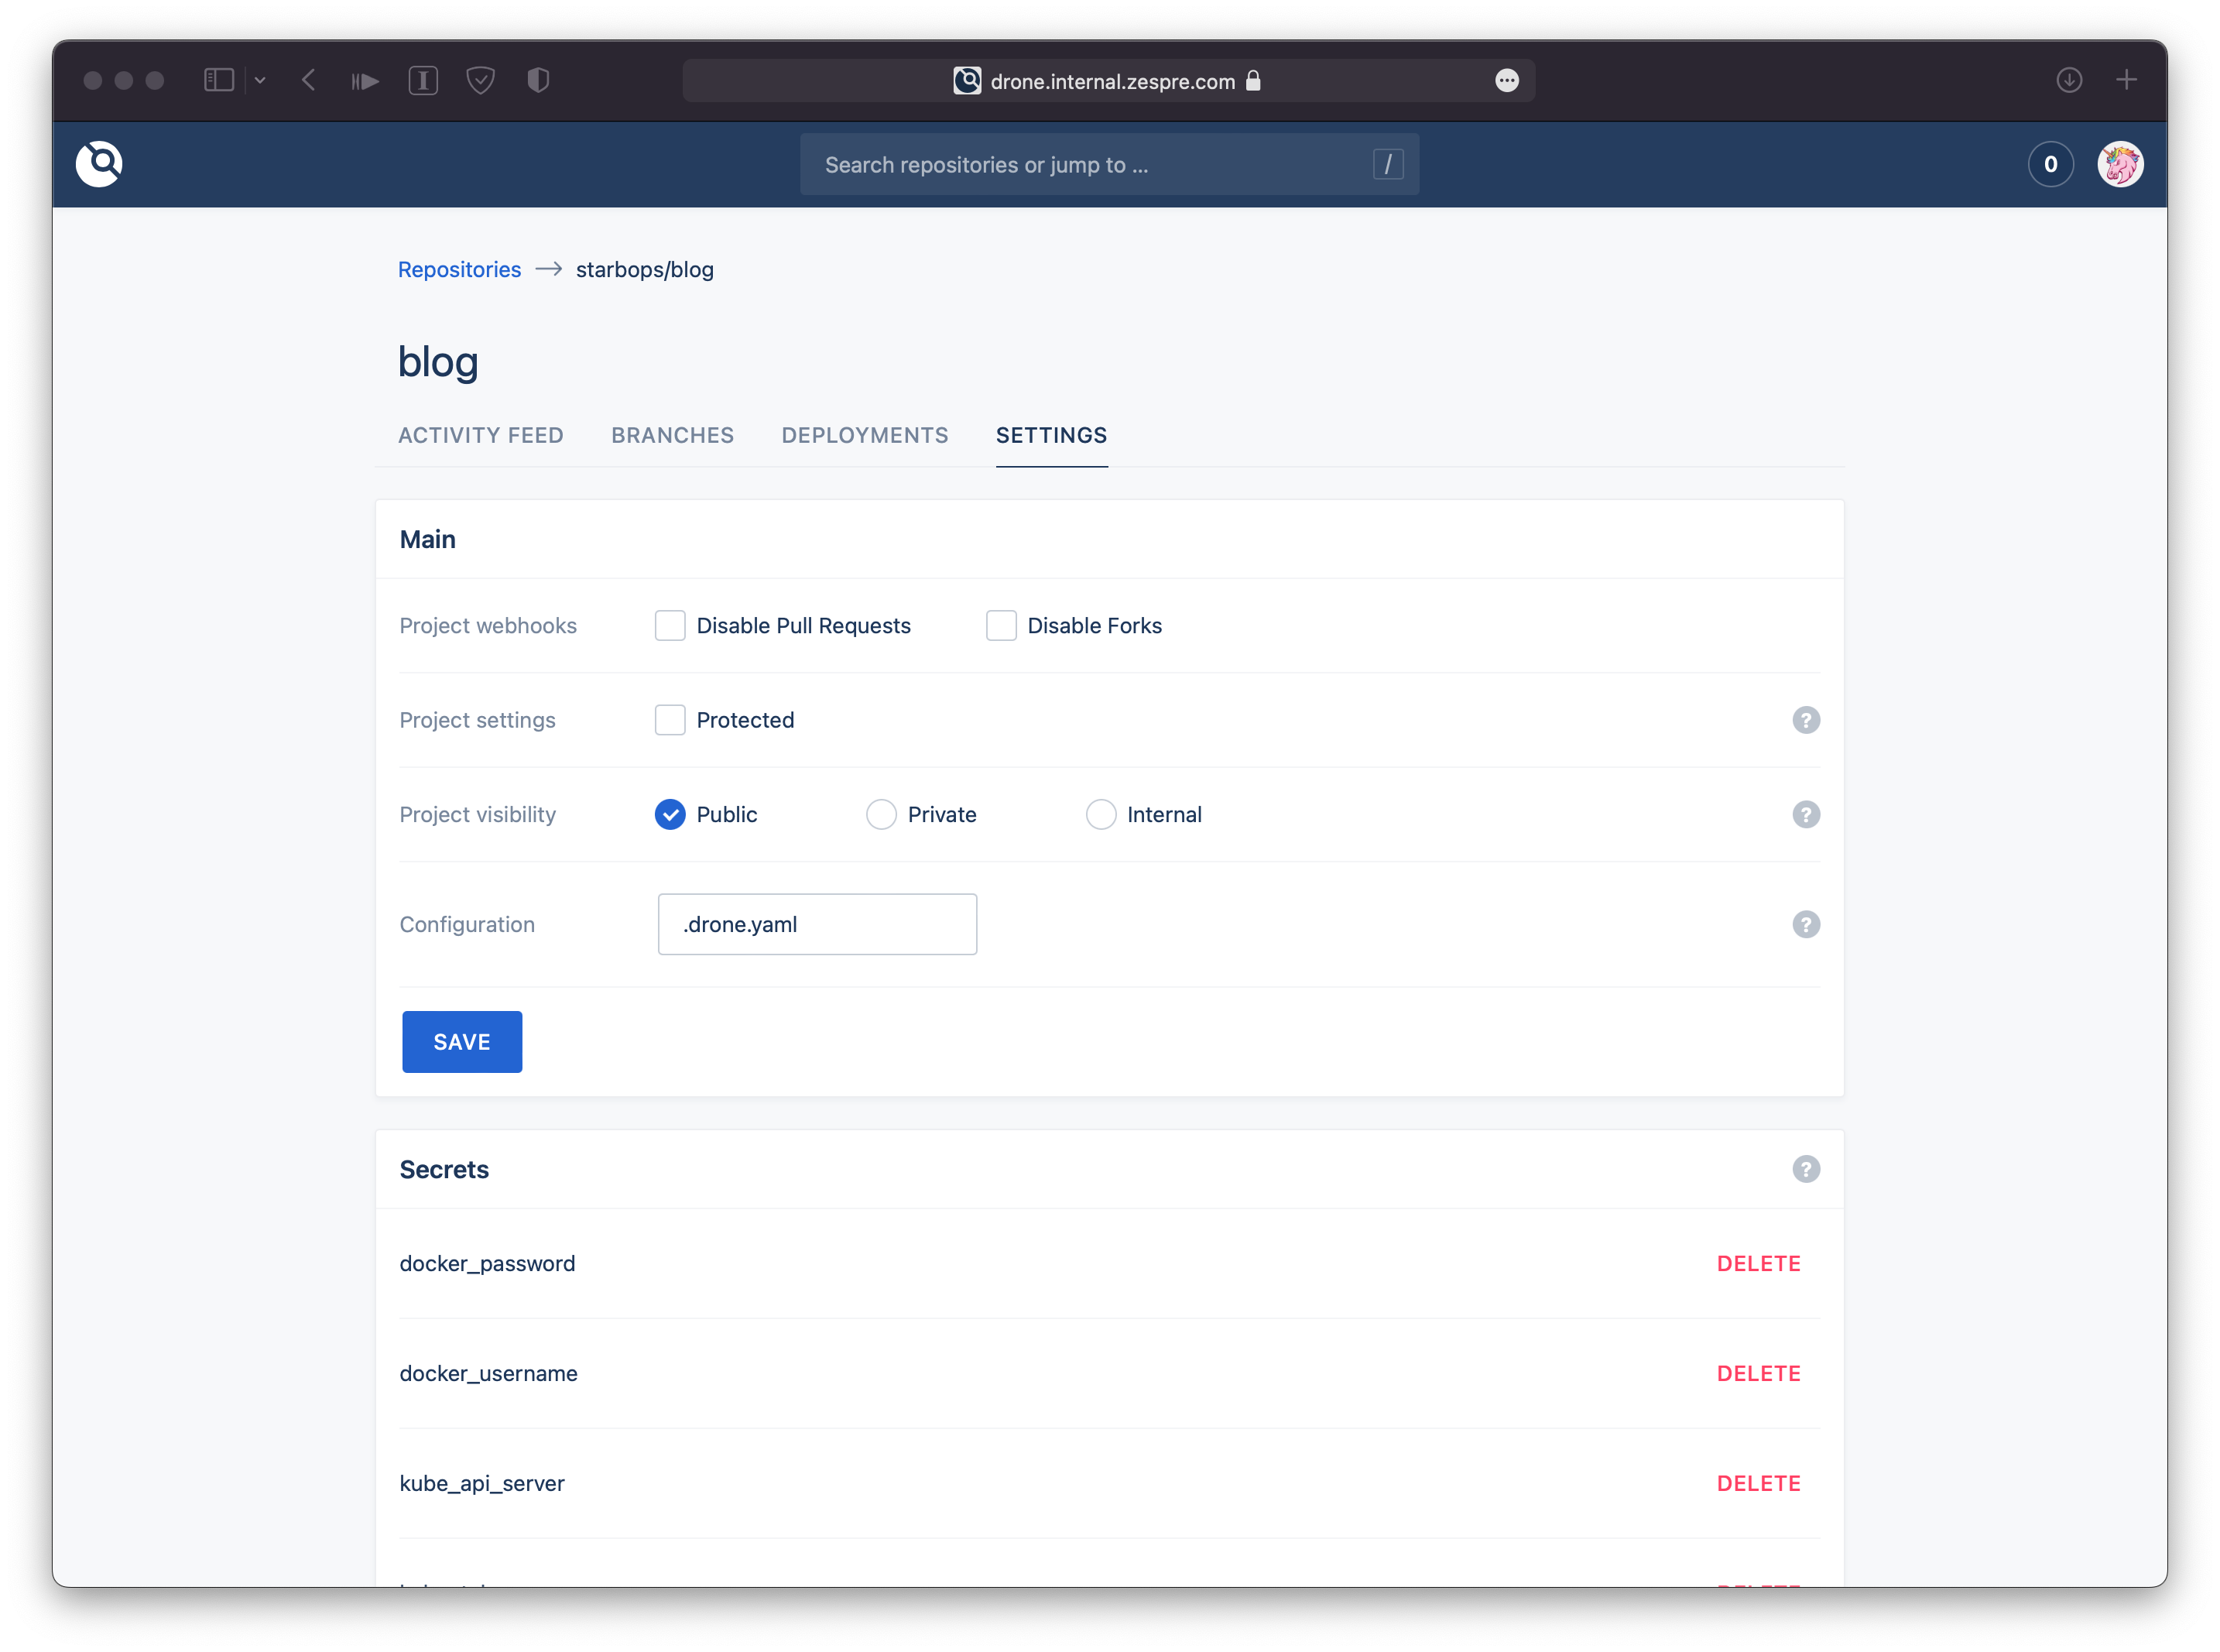
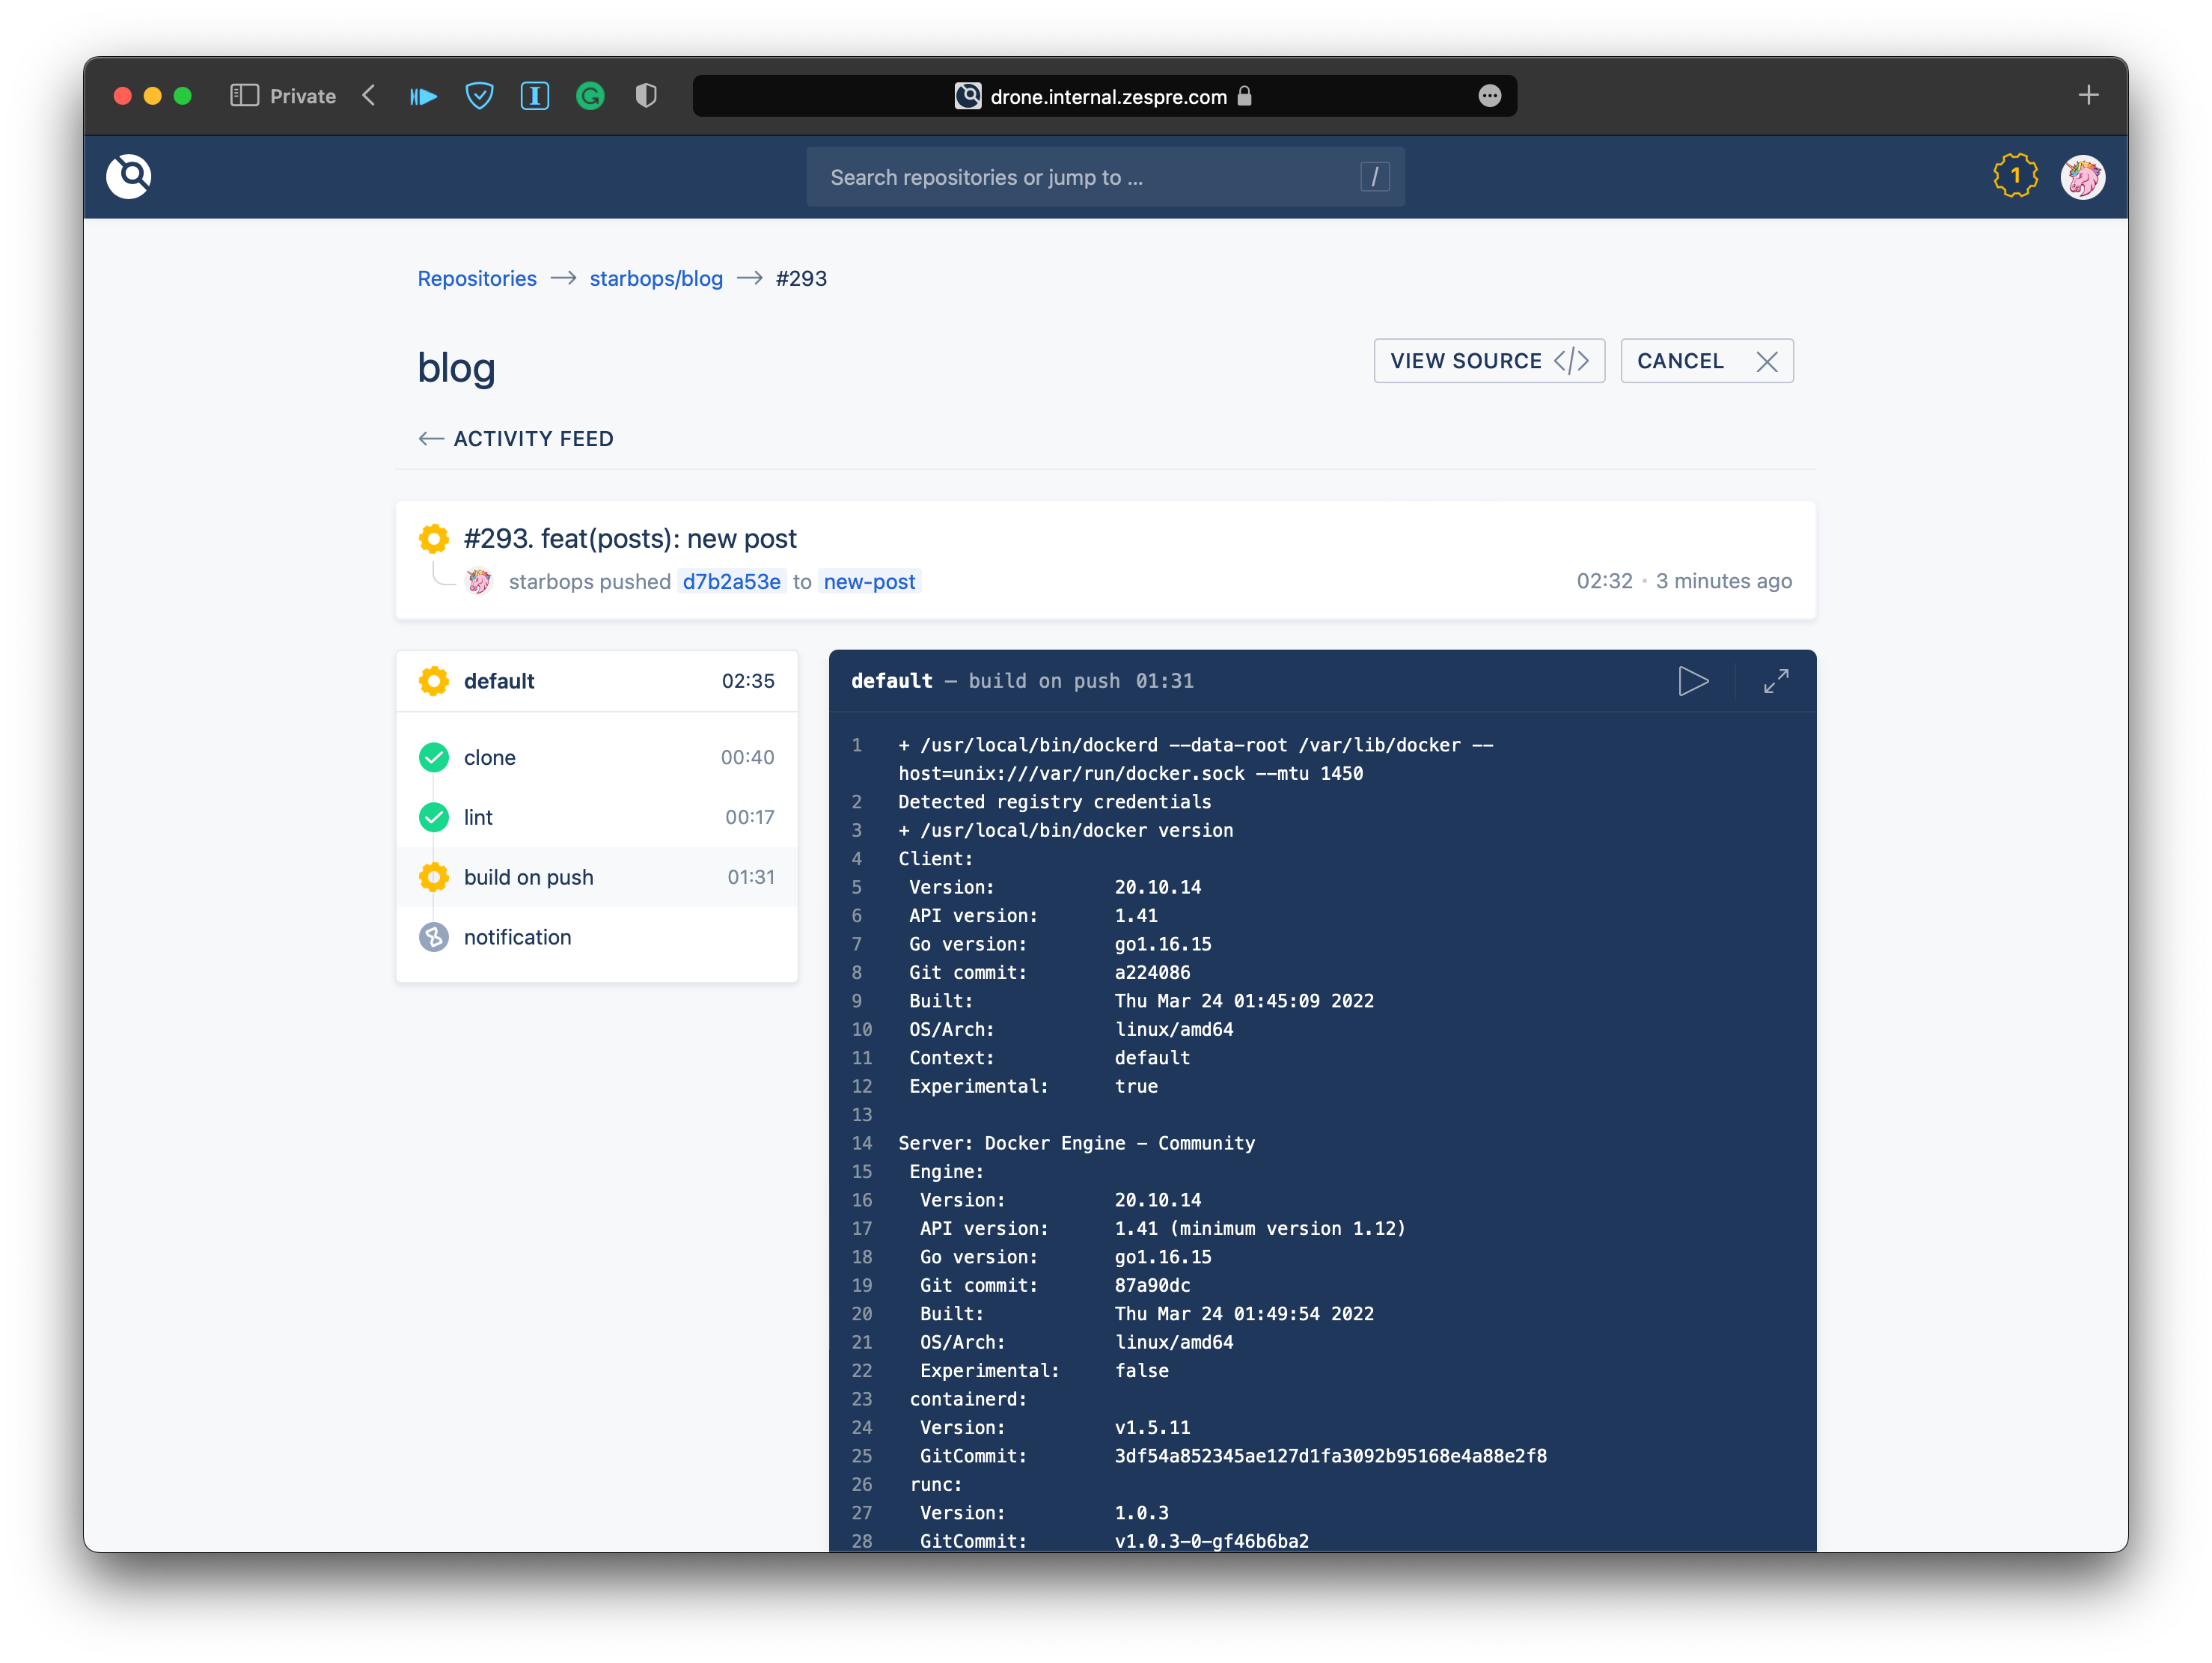
Drone
$ helm upgrade --install drone drone \
    -f drone-values.yaml \
    --create-namespace \
    --namespace drone \
    --repo https://charts.drone.io
$ helm upgrade --install drone-runner-kube drone-runner-kube \
    -f drone-runner-kube-values.yaml \
    --create-namespace \
    --namespace drone \
    --repo https://charts.drone.io
In drone-values.yaml:
---
persistentVolume:
  storageClass: nfs-client

ingress:
  enabled: true
  hosts:
  - host: drone.internal.example.com
    paths:
    - path: "/"
      pathType: Prefix
  tls:
  - hosts:
    - drone.internal.example.com

env:
  DRONE_SERVER_HOST: drone.internal.example.com
  DRONE_SERVER_PROTO: https
  DRONE_RPC_SECRET: randomly-generated-secret-here

  DRONE_GITEA_CLIENT_ID: <redacted>
  DRONE_GITEA_CLIENT_SECRET: <redacted>
  DRONE_GITEA_SERVER: https://git.internal.example.com
  DRONE_GIT_ALWAYS_AUTH: true
In drone-runner-kube-values.yaml:
---
rbac:
  buildNamespaces:
  - drone

env:
  DRONE_RPC_SECRET: randomly-generated-secret-here
  DRONE_NAMESPACE_DEFAULT: drone

Final Integration
.drone.yaml:
kind: pipeline
 type: kubernetes
 name: default
 steps:
 - name: lint
   image: ruby:2.7.1-buster
   commands:
   - gem install mdl
   - mdl blog/*.md blog/_posts/*.md
 - name: build on tag
   image: plugins/docker
   settings:
     mtu: 1450
     registry: registry.internal.example.com
     repo: registry.internal.example.com/starbops/blog
     tags:
     - ${DRONE_TAG##v}-${DRONE_COMMIT_SHA:0:7}
     username:
       from_secret: docker_username
     password:
       from_secret: docker_password
     build_args:
     - JEKYLL_ENV=production
     - VERSION=${DRONE_TAG##v}-${DRONE_COMMIT_SHA:0:7}
   when:
     event:
     - tag
 - name: build on push
   image: plugins/docker
   settings:
     mtu: 1450
     registry: registry.internal.example.com
     repo: registry.internal.example.com/starbops/blog
     tags:
     - latest
     - ${DRONE_COMMIT_SHA:0:7}
     username:
       from_secret: docker_username
     password:
       from_secret: docker_password
     build_args:
     - JEKYLL_ENV=development
     - VERSION=${DRONE_COMMIT_SHA:0:7}
   when:
     event:
     - push
 - name: deploy to staging
   image: bitsbeats/drone-helm3
   settings:
     kube_api_server:
       from_secret: kube_api_server
     kube_token:
       from_secret: kube_token_staging
     kube_skip_tls: true
     lint: false
     build_dependencies: false
     chart: zpcc/blog
     release: blog
     namespace: blog-staging
     timeout: 5m
     helm_repos:
     - zpcc=https://charts.internal.example.com
     envsubst: true
     values:
     - image.tag=${DRONE_COMMIT_SHA:0:7}
     - imagePullSecrets[0].name=regcred
   when:
     event:
     - push
     branch:
     - master
 - name: deploy to prod
   image: bitsbeats/drone-helm3
   settings:
     kube_api_server:
       from_secret: kube_api_server
     kube_token:
       from_secret: kube_token_prod
     kube_skip_tls: true
     lint: false
     build_dependencies: false
     chart: zpcc/blog
     release: blog
     namespace: blog-prod
     timeout: 5m
     helm_repos:
     - zpcc=https://charts.internal.example.com
     envsubst: true
     values:
     - image.tag=${DRONE_TAG##v}-${DRONE_COMMIT_SHA:0:7}
     - imagePullSecrets[0].name=regcred
     - ingress.enabled=true
     - ingress.annotations.kubernetes\\.io/ingress\\.class=nginx-cloud
     - ingress.annotations.cert-manager\\.io/cluster-issuer=letsencrypt-prod-cloud
     - ingress.hosts[0].host=blog.example.com
     - ingress.hosts[0].paths[0].path="/"
     - ingress.tls[0].hosts[0]=blog.example.com
     - ingress.tls[0].secretName=blog-tls
   when:
     event:
     - tag
 - name: notification
   image: plugins/slack
   settings:
     webhook: https://mattermost.internal.example.com/hooks/d1ymz9ie3fyrudk67qon6hc4dr
     channel: cicd
     username: drone-bot
     icon_url: https://pbs.twimg.com/profile_images/1291040329395613698/bpYKcF66_400x400.jpg
   when:
     status:
     - success
     - failure
$ kubectl -n drone get pods drone-1vm0inc02qppitcpil9s \
    -o jsonpath='{range .spec.containers[*]}{.name}{"\t"}{.image}{"\n"}{end}'
drone-e34n2kzrxfm4uelofsh6      drone/git:latest
drone-zwpdoaar9z4cc3cvx7tm      docker.io/library/ruby:2.7.1-buster
drone-to3dil7z30ydj30ay27w      docker.io/plugins/docker:latest
drone-4j6jzl2lhogttpoekpox      drone/placeholder:1
drone-55wpfjiyycnwv2338xqw      drone/placeholder:1
drone-afmx6bk3s1nwkst0dn2k      docker.io/bitsbeats/drone-helm3:latest
drone-j3n4pf7gazaqqpgjro12      docker.io/plugins/slack:latest
Pros and Cons
The deployment pipeline is only triggered when the environment repository changes. It cannot automatically notice any deviations from the environment and its desired state. This means it needs some ways of monitoring in place so that one can intervene if the environment doesn’t match what is described in the environment repository.
Future Work
- Implement chart pipeline
- Make blogging on mobile devices possible, like an iPad with a magic keyboard
- Adopt a more comprehensive GitOps tool like ArgoCD
- Collect monitoring metrics
- Introduce cache layer (CDN etc.)
Wrapping Up
In this lengthy article, we bootstrap a static blog and put it onto Kubernetes, following the GitOps approach.
Setting all these up might be hard