Craft Your Own GitHub Pages Services
GitHub has already provided a nice platform to host your static blog which called GitHub Pages, but I still want to build my system which could achieve the same goal. I believe it will be awesome. So, here comes the “Homemade GitLab Pages” (I also knew that GitLab provides similar features, too). It is actually not that mature as GitHub Pages is. It does not support multiple users, need to work with specific static blog generator, and is hard to build. But nothing can stop us!
Overview
There are four main components in this system:
GitLab, Jenkins, and Docker are all secured by SSL/TLS.
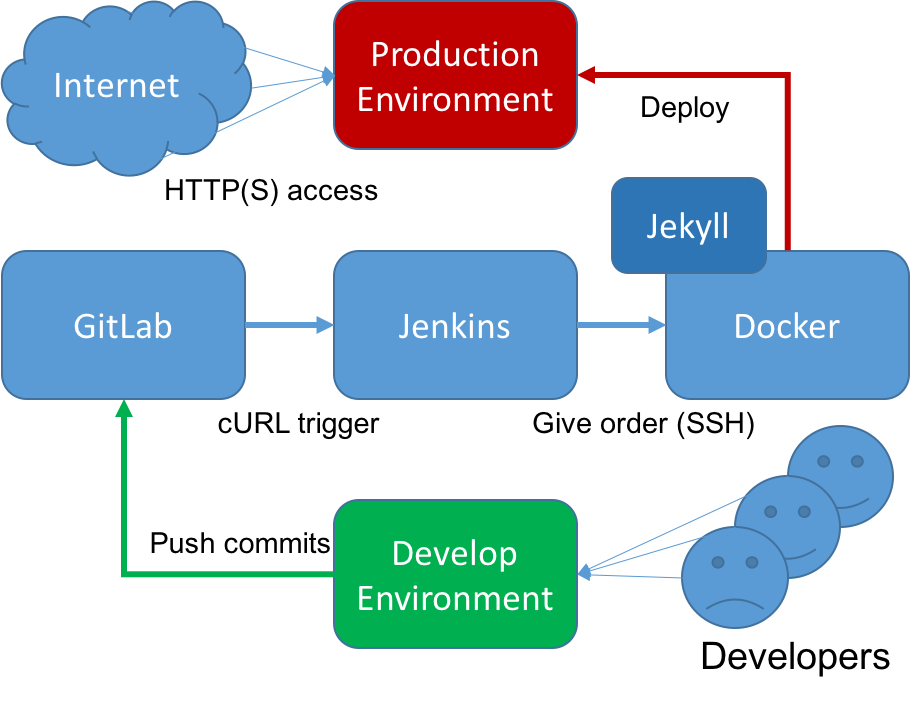
The overall workflow are shown above. We can write some “raw” blog posts in Markdown format, commit and push these posts on to the GitLab server so all your blog posts are now under version control. Then we use a simple web hook (actually I think it’s just a simple HTTP request generated by cURL) provided by GitLab in project settings. The jenkins will be notified, and starts to clone or update the codebase, which is our newly pushed blog posts. These updates will reflect on the remote build server because we’ll transfer them to that server. The build server, a.k.a. Docker server, plays an important role in our workflow. It will run a Jekyll container to build our blog posts, which are in the Markdown format, into some HTML pages. Finally we copy those HTML pages inside the container and transfer to the production web server, this is so called “deployment”. The whole process is smoothy, fully automated, and repeatable.
This article assumes that you already knew how to generate private keys and certificates using EasyRSA and Let’s Encrypt. Maybe I’ll introduce those things someday in the future.
GitLab Server
GitLab is a web-based Git repository manager, with wiki and issue tracking features. Currently, GitLab has two editions:
- Community Edition (CE)
- Enterprise Edition (EE)
Some of the features are not implemented in the CE. Still we can do some tricks to achieve the same goal.
Installation
We use sameersbn/docker-gitlab as base, modify some options in
docker-compose.yml to enhance security (which is a little bit buggy) and
connected with mail services. Docker Compose is also worth mentioning:
Compose is a tool for defining and running multi-container Docker application.
Anyway, Docker Compose is a very convenient tool in multi-container scenario.
You just “up” and “down” the application which consists of multiple containers
in seconds. To get your GitLab server running, you need two other supporting
containers to run: PostgreSQL and Redis. Below is my docker-compose.yml, feel
free to modify it in your environment:
postgresql:
  restart: always
  image: sameersbn/postgresql:9.4-11
  environment:
    - DB_USER=gitlab
    - DB_PASS=password
    - DB_NAME=gitlabhq_production
  volumes:
    - /etc/localtime:/etc/localtime:ro
    - /srv/docker/gitlab/postgresql:/var/lib/postgresql
gitlab:
  restart: always
  image: sameersbn/gitlab:8.3.4-1
  links:
    - redis:redisio
    - postgresql:postgresql
  ports:
    - "127.0.0.1:10080:80"
    - "10022:22"
  environment:
    - DEBUG=false
    - TZ=Asia/Taipei
    - GITLAB_TIMEZONE=Taipei

    - GITLAB_SECRETS_DB_KEY_BASE=Jvkmjrt3sFtHxmKJVqqPVVfK7RXqJrLX73FtCXwcPvdk7VmMVNrtXjswLcnVrXRK

    - GITLAB_HOST=gitlab.zespre.net
    - GITLAB_PORT=443
    - GITLAB_SSH_PORT=10022
    - GITLAB_RELATIVE_URL_ROOT=

    - GITLAB_NOTIFY_ON_BROKEN_BUILDS=true
    - GITLAB_NOTIFY_PUSHER=false

    - GITLAB_EMAIL=notifications@gitlab.zespre.net
    - GITLAB_EMAIL_REPLY_TO=noreply@gitlab.zespre.net
    - GITLAB_INCOMING_EMAIL_ADDRESS=reply@gitlab.zespre.net

    - GITLAB_BACKUP_SCHEDULE=daily
    - GITLAB_BACKUP_TIME=01:00

    - SMTP_ENABLED=true
    - SMTP_DOMAIN=zespre.com
    - SMTP_HOST=mail.zespre.net
    - SMTP_PORT=587
    - SMTP_STARTTLS=true

    - GITLAB_HTTPS=true

    - LDAP_ENABLED=true
    - LDAP_HOST=winterfell.zespre.net
    - LDAP_UID=uid
    - LDAP_METHOD=tls
    - LDAP_ACTIVE_DIRECTORY=false
    - LDAP_BASE=ou=People,dc=zespre,dc=net
    - LDAP_USER_FILTER=(memberOf=cn=gGreathouses,ou=Group,dc=zespre,dc=net)
  volumes:
    - /etc/localtime:/etc/localtime:ro
    - /srv/docker/gitlab/gitlab:/home/git/data
    - /srv/docker/gitlab/certs:/home/git/data/certs
redis:
  restart: always
  image: sameersbn/redis:latest
  volumes:
    - /etc/localtime:/etc/localtime:ro
    - /srv/docker/gitlab/redis:/var/lib/redis
If you have read the readme of the project, you’ll notice that I did not provide
the SSL certificate and key for it but leave the GITLAB_HTTPS remained “true”.
That’s because we expose plain text HTTP on 127.0.0.1, which is considered
relatively safer than exposing to everybody on the Internet. How about the
clients on the Internet? How do they get access to Gitlab server? I’ll explain
that in the Nginx reverse proxy section. Also, I integrated my
LDAP service with GitLab. Users who have the ability to login to my workstation
can login to GitLab (I’ve already integrated LDAP authentication into ZPCC, but
I will not include that part in the article).
With docker-compose.yml being prepared, we can simply issue following command:
sudo docker-compose up -d
Create a Project
Simply create a Git repo called “blog” or whatever you want, and set its “Visibility Level” to “Public”, otherwise you’ll have to deal with credential problem when you configure Jenkins job later.
Configure the Project
Now is time to configure the web hook which connects GitLab and Jenkins when there are new commits pushed on to the GitLab. Go to Settings -> Web Hooks of the project. Add a web hook:
https://jenkins.zespre.net/gitlab/build_now
Choose appropriate triggers. Now we only need “Push events”. Then check the “Enable SSL verification”. You don’t have to test the hook. Since we haven’t configure Jenkins yet, it’ll fail.
GitLab settings are relatively easy compares to Jenkins’.
Jenkins Server
Jenkins is an open source continuous integration tool written in Java. It supports various SCM tools including CVS, Subversion, Mercurial, Git, etc., and can execute Apache Ant and Apache Maven based projects as well as arbitrary shell scripts and Windows batch commands. In this article I use Jenkins to help building the blog when new blog posts are committed and pushed to GitLab server.
Installation
I choose to run Jenkins server inside the Docker container because it’s fast to deploy (on the other hand, it reduces debugging time when you modify some config and restart the server).
We need some system packages and Jenkins plugins, which do not exist in the Docker image, to achieve our goal. So we have to craft our own Docker image which suits our needs. Download the source of Official Jenkins Docker image. Install these plugin at the beginning so you would’n have to manually install it from Jenkins web UI.
FROM jenkins:latest
MAINTAINER Zespre Schmidt <starbops@zespre.com>

USER root
RUN apt-get update && \
    LC_ALL=C DEBIAN_FRONTEND=noninteractive apt-get install -y rsync
COPY ca.crt /usr/local/share/ca-certificates/ca.crt
RUN update-ca-certificates

USER jenkins

COPY plugins.txt /usr/share/jenkins/ref/plugins.txt
RUN /usr/local/bin/plugins.sh /usr/share/jenkins/ref/plugins.txt
Here is the plugin.txt which lists all the plugins you need along with its
version. Pick what you need. Install the plugins through Jenkins web UI is easy,
but you have to manually handle the dependency problems if you install plugins
this way.
git:2.4.2
scm-api:1.0
token-macro:1.12.1
promoted-builds:2.24
git-client:1.19.4
parameterized-trigger:2.4
matrix-project:1.6
credentials:1.24
mailer:1.16
ssh-credentials:1.11
postbuildscript:0.17
ivy:1.26
publish-over-ssh:1.13
config-file-provider:2.10.0
disk-usage:0.28
jobConfigHistory:2.12
maven-plugin:2.12.1
docker-plugin:0.16.0
ssh-slaves:1.10
durable-task:1.7
gitlab-hook:1.4.1.1
email-ext:2.41
ruby-runtime:0.12
workflow-step-api:1.13
analysis-core:1.75
script-security:1.17
junit:1.10
Unlike the GitLab section above, we only have to run single container at one
time. We still choose Docker Compose because of convenience. Of course you can
run it through docker run, but you have to type and memorize those long and
ugly command line options. Just simply fire docker-compose up -d and we’re
good to go. Why not get things done in an easier way? Here is the content of
docker-compose.yml:
jenkins:
  restart: always
  build: .
  mem_limit: 2048m
  ports:
    - 127.0.0.1:8080:8080
    - 50000:50000
  environment:
    JAVA_OPTS: -Dorg.apache.commons.jelly.tags.fmt.timeZone=Asia/Taipei
    JENKINS_OPTS: --handlerCountStartup=100 --handlerCountMax=300
  volumes:
    - /etc/localtime:/etc/localtime:ro
    - /srv/docker/jenkins/data:/var/jenkins_home
Again we bind the port on 127.0.0.1:8080 to lower the possibility being
sniffed. Let Nginx enhances the connections security via reverse proxy.
Set Up SSH Host
There are two hosts should be set up in Jenkins. Please be sure that the “Jenkins Publish Over SSH Plugin” is enabled.
- Docker host (to let us run Docker container to build the blog)
- Web server host (to let us deploy the blog)
Here “deploy” actually means “rsync files between hosts”. Go to Jenkins -> Manage Jenkins -> Configure System -> Publish Over SSH to set up SSH hosts. Since Docker host and web server host are identical in my environment, I only have to set one SSH host.
Some may have noticed that in our Jenkins environment, there is a plugin called
“Docker plugin”. But why do we use “Publish Over SSH plugin” rather than “Docker
plugin”? This is because we have special behavior in our Jenkins job which
“Docker plugin” doesn’t support: docker cp. Since “Docker plugin” does not
have the ability, we choose to use “Publish Over SSH plugin” instead. With this
plugin, we can do whatever we want through shell scripts, including docker cp.
Create a Project
The name of the project in Jenkins must be identical to one in GitLab. I gave it a trivial name blog, and the job type is Build a free-style software project.
Source Code Management
Select “Git” in the section of “Source Code Management” then enter the repository URL of the blog in GitLab.
Build Environment
Jenkins will download files from Git repository into workspace, which is inside
the Docker container. However, we need another Docker container to help us build
the static blog. I don’t want to build something called DinD (Docker in Docker),
that’s too complicated for me. I just want to build a static blog! So an easier
way to deal with this mess is to transfer the files under the directory we just
downloaded from Git repository to the Docker host. In “Build Environment”
section, check “Send files or execute commands over SSH before the build starts”
option. Then under the option there are plenty text boxes to fill. Type */*,*
in “Source files” and blog in “Remote directory”. This simply upload all the
files inside workspace to our Docker host.
Build Step
Add a build step called “Send files or execute commands over SSH” in “Build”
section. Select the Docker host we’ve mentioned before in SSH Server dropdown.
Enter the following shell script In the “Exec command” text box. The shell
script will run a Docker container which based on official Jekyll Docker image,
then it builds up the static blog for you. The result will reside under
/tmp/_site inside the Docker container. Now the trickiest part comes: we have
to move the whole generated Jekyll static blog out of the stopped container. So
we use docker cp to copy those files inside the stopped container to somewhere
else in Docker host. This is the only way to get your stuff. According to my
experiments, use Docker volume will cause jekyll build failed.
sudo docker run --name jekyll-builder -v /home/jerkins/blog:/srv/jekyll jekyll/jekyll:builder jekyll build --destination /tmp/_site
if [ -d _site ]; then
    sudo rm -rf _site
fi
sudo docker cp jekyll-builder:/tmp/_site /home/jerkins/_site
sudo docker rm -v jekyll-builder
Post-build Step
Next step is to ship the generated static blog. Create a post-build action
called “Execute a set of scripts” in “Post-build Actions” section. Inside the
block, create another “Build step” called “Send files or execute commands over
SSH”. Select the web server host we’ve mentioned before in SSH Server dropdown.
Then type the following shell scripts in “Exec command” text box. Currently we
just purge the old files under the directory then copy the new files from
somewhere else. Maybe it can be improved by rsync.
if [ -d /home/jerkins/_site ];
then
    sudo rm -rf /usr/share/nginx/html/blog/*
    sudo cp -r /home/jerkins/_site/* /usr/share/nginx/html/blog/
else
    exit 1
fi
Congrats! The settings of Jenkins are finished. You can add more post-build steps like email notification or Slack notification, all up to you. Next section I’ll show you how to configure Nginx to expose our internal GitLab and Jenkins serivces with SSL/TLS.
Nginx
The following figure briefly gives you an concept about how reverse proxy works.
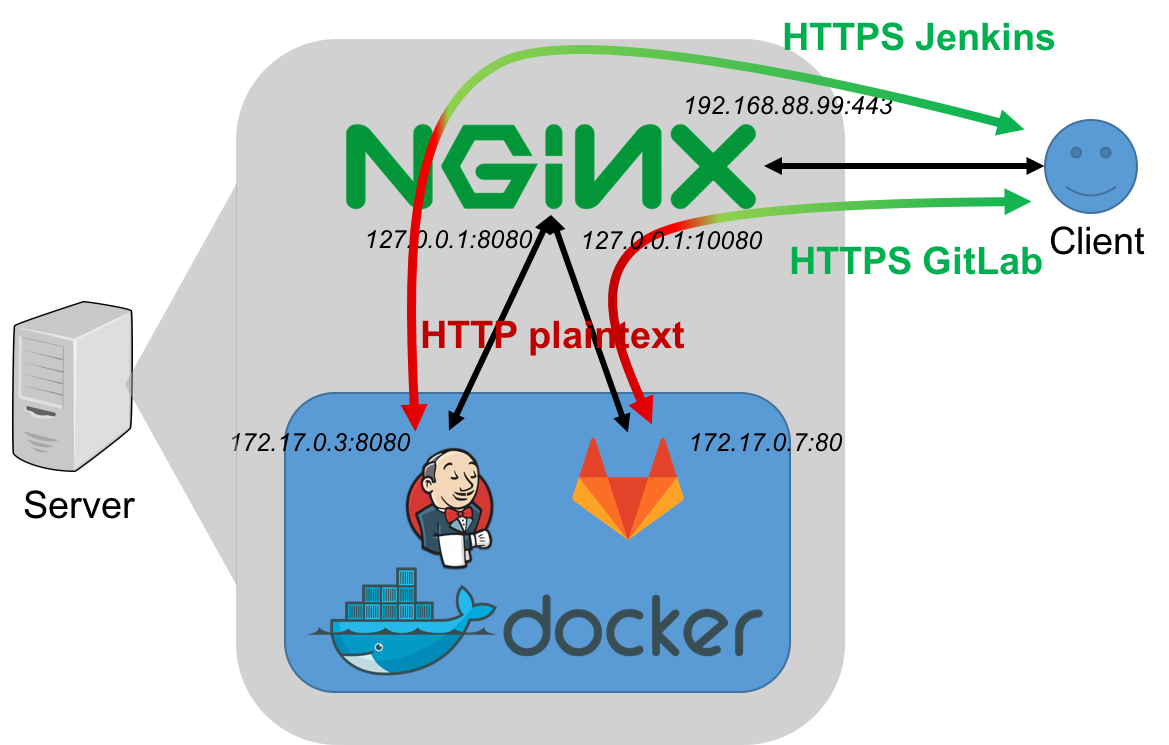
Assume that Nginx is running on Ubuntu server, we need to add and modify some config files.
Reverse Proxy
The following is the Nginx configuration file for serving Jenkins through reverse proxy:
server {
    listen      443;
    server_name jenkins.zespre.net;

    ssl_certificate     /srv/docker/jenkins/certs/jenkins.crt;
    ssl_certificate_key /srv/docker/jenkins/certs/jenkins.key;

    ssl                       on;
    ssl_session_cache         builtin:1000 shared:SSL:10m;
    ssl_protocols             TLSv1 TLSv1.1 TLSv1.2;
    ssl_ciphers               HIGH:!aNULL:!eNULL:!EXPORT:!CAMELLIA:!DES:!MD5:!PSK:!RC4;
    ssl_prefer_server_ciphers on;

    access_log /var/log/nginx/jenkins.access.log;

    location / {
        proxy_set_header Host $host;
        proxy_set_header X-Real-IP $remote_addr;
        proxy_set_header X-Forwarded-For $proxy_add_x_forwarded_for;
        proxy_set_header X-Forwarded-Proto $scheme;

        proxy_pass         http://127.0.0.1:8080;
        proxy_read_timeout 90;

        proxy_redirect http://127.0.0.1:8080 https://jenkins.zespre.net;
    }
}
The following is the Nginx configuration file for serving GitLab through reverse proxy:
server {
    listen      443;
    server_name gitlab.zespre.net;

    ssl_certificate     /srv/docker/gitlab/certs/gitlab.crt;
    ssl_certificate_key /srv/docker/gitlab/certs/gitlab.key;

    ssl                       on;
    ssl_session_cache         builtin:1000 shared:SSL:10m;
    ssl_protocols             TLSv1 TLSv1.1 TLSv1.2;
    ssl_ciphers               HIGH:!aNULL:!eNULL:!EXPORT:!CAMELLIA:!DES:!MD5:!PSK:!RC4;
    ssl_prefer_server_ciphers on;

    access_log /var/log/nginx/gitlab.access.log;

    location / {
        proxy_set_header Host $host;
        proxy_set_header X-Real-IP $remote_addr;
        proxy_set_header X-Forwarded-For $proxy_add_x_forwarded_for;
        proxy_set_header X-Forwarded-Proto $scheme;

        proxy_pass         http://127.0.0.1:10080;
        proxy_read_timeout 90;

        proxy_redirect http://127.0.0.1:10080 https://gitlab.zespre.net;
    }
}
The GitLab and Jenkins server should not be accessed by everybody for security concerns. As you can see, the GitLab and Jenkins server are protected from Internet threats by the nature of private networks. The connections between the servers and the clients are also secured through HTTPS. That’s totally awesome!
Virtual Host for Blog
And this is for serving the blog directly, not reversely:
server {
    listen      443 ssl;
    server_name blog.zespre.com;

    ssl_certificate     /etc/letsencrypt/live/blog.zespre.com/fullchain.pem;
    ssl_certificate_key /etc/letsencrypt/live/blog.zespre.com/privkey.pem;

    ssl                       on;
    ssl_session_cache         builtin:1000 shared:SSL:10m;
    ssl_protocols             TLSv1 TLSv1.1 TLSv1.2;
    ssl_ciphers               HIGH:!aNULL:!eNULL:!EXPORT:!CAMELLIA:!DES:!MD5:!PSK:!RC4;
    ssl_prefer_server_ciphers on;

    access_log /var/log/nginx/blog.zespre.com.access.log;

    root  /usr/share/nginx/html/blog;
    index index.html index.htm;
}
So everyone on the Internet can browse the blog with HTTPS enabled, another awesome (for someone might think HTTPS is needless for static website, please take a look at this article)!
We have almost constructed the whole workflow. Next I’ll describe how to build your local development environment (the place you can write your article, build testing site to check how it looks like).
Local Development Environment
Build up your local development environment. I will take Mac OS X as an example.
Install Jekyll
Jekyll is based on Ruby, so we’ll install Ruby first.
brew install rbenv ruby-build ruby-default-gems
rbenv install 2.1.1
rbenv global 2.1.1
gem install jekyll kramdown
Embed Gist Code Block
Install jekyll-gist if you want to embed Gist in your blog:
gem install jekyll-gist
Add the following lines in the _config.yml to tell Jekyll to use this Gem:
gems:
  - jekyll-gist
Trigger the Workflow
Now we’re all set. Just scaffold you new blog with:
jekyll new blog
cd blog/
And starts to write something under _post/:
vim _posts/2016-02-14-lorem-ipsum-dolor-sit-amet.md
Then commit the new article and push it to the Git server:
git add _posts/2016-02-14-lorem-ipsum-dolor-sit-amet.md
git commit -m 'New article'
git remote add origin https://gitlab.zespre.com/starbops/blog.git
git push -u origin master
Boom! Let’s check it out what happened out there. You pushed a new commit to the GitLab. This triggered GitLab’s web hook, so it sent a request to Jenkins which trigger the job. Jenkins started to build your static blog and deployed it to the right place which Nginx can serve to everybody on the Internet!
Summary
With this system, I can simply write blog posts in Markdown format, then commit it and push it up to the Git server. New blog posts are generated automatically just in seconds. The workflow is fluent so I can focus on my writing. And everyone on the Internet can view my blog posts with encrypted connections because of Let’s Encrypt (though some might think it’s unnecessary for a static blog).
This workflow still needs to be refined. A more soundness way is to package the new article along with the whole site and web server into a Docker image, then ship it to the Docker registry. Finally run the container from the image. This makes much more sense according to CI/CD workflow. However I’m still working on this.
This article is quite long for me. I might miss some part but I cannot remember right now. If you think some of my configurations or statements are deprecated or problematic, please send me an email. Comments are welcome!