Hadoop with HA
Overview of Hadoop High Availability
Before we can go about configuring YARN HA it’s important that you have:
- Setup a Hadoop and YARN cluster
- Setup a ZooKeeper cluster
High Availability in Hadoop should be considered in two parts: HDFS & YARN. Both need a ZooKeeper cluster.
HDFS High Availability
NameNode Architecture
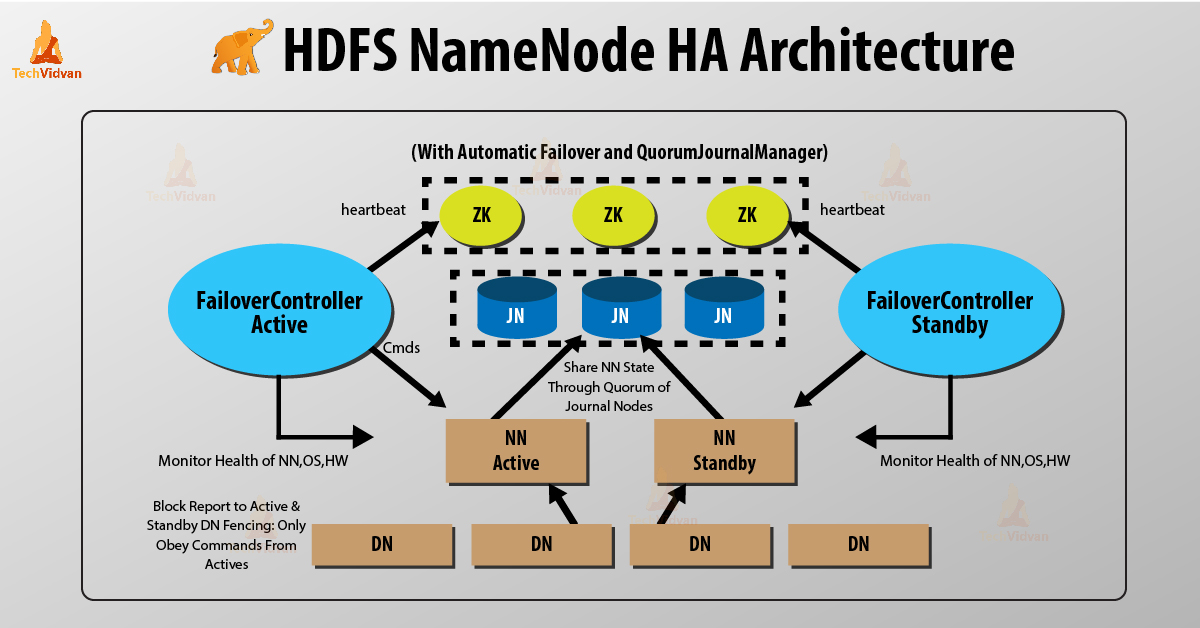
In a typical HA cluster, two or more separate machines are configured as NameNodes. In a working cluster, one of the NameNode machine is in the Active state, and the others are in the Standby state.
The Active NameNode is responsible for all client operations in the cluster, while the Standby NameNode acts as a backup. The Standby machine maintains enough state to provide a faster failover (if required).
In order for the Standby node to keep its state synchronized with the Active node, both nodes communicate with a group of separate daemons called JournalNodes (JNs). When the Active node performs any namespace modification, the Active node durably logs a modification record to a majority of these JNs. The Standby node reads the edits from the JNs and continuously watches the JNs for changes to the edit log. Once the Standby Node observes the edits, it applies these edits to its own namespace. When using QJM, JournalNodes act as the shared editlog storage. In a failover event, the Standby ensures that it has read all of the edits from the JournalNodes before promoting itself to the Active state. (This mechanism ensures that the namespace state is fully synchronized before a failover completes.)
To provide a fast failover, it is also necessary that the Standby node has up-to-date information on the location of blocks in your cluster. To get accurate information about the block locations, DataNodes are configured with the location of all the NameNodes, and send block location information and heartbeats to all the NameNode machines.
ResourceManager High Availability
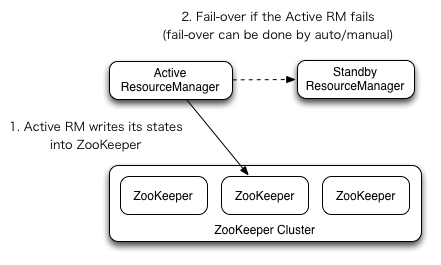
The ResourceManager (RM) is responsible for tracking the resources in a cluster, and scheduling applications (e.g. MapReduce jobs). Prior to Hadoop 2.4, the ResourceManager is the single point of failure in a YARN cluster. The High Availability feature adds redundancy in the form of an Active/Standby ResourceManager pair to remove this otherwise single point of failure.
Manual transition and failover
When automatic failover is not enabled, admins have to manually transtion one of
the RMs to Active. To failover from one RM to the other, they are expected to
first transition the Active-RM to Standby and transition a Standby-RM to Active.
All this can be done using the yarn rmadmin CLI.
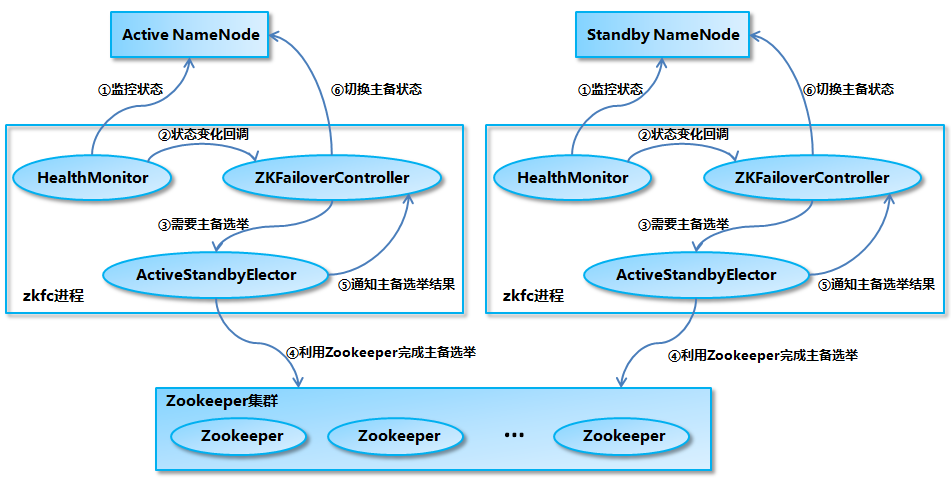
Automatic failover
The RMs have an option to embed the Zookeeper-based ActiveStandbyElector to decide which RM should be the Active. When the Active goes down or becomes unresponsive, another RM is automatically elected to be the Active which then takes over. Note that, there is no need to run a separate ZKFC daemon as is the case for HDFS because ActiveStandbyElector embedded in RMs acts as a failure detector and a leader elector instead of a separate ZKFC daemon.
Installation Steps
ZooKeeper Cluster
Please refer to ZooKeeper 3-Node Cluster Installation Guide to complete 3-node cluster first.
Prerequisites
-
Hadoop master nodes need second external interface configured
$ sudo mv /etc/netplan/50-cloud-init.yaml /etc/netplan/01-netcfg.yaml $ cat /etc/netplan/01-netcfg.yaml # This file is generated from information provided by # the datasource. Changes to it will not persist across an instance. # To disable cloud-init's network configuration capabilities, write a file # /etc/cloud/cloud.cfg.d/99-disable-network-config.cfg with the following: # network: {config: disabled} network: ethernets: ens18: dhcp4: true dhcp4-overrides: use-routes: false ens19: dhcp4: false dhcp6: false addresses: [100.74.41.144/24] gateway4: 100.74.41.254 version: 2 $ sudo netplan apply -
Create
hadoopuser on all nodes,sudo useradd hadoop -m sudo usermod --shell /bin/bash hadoop sudo passwd hadoop - Install
openjdk-8-jdkon all nodes, - Generate SSH key on all master nodes
- Copy master nodes’ public keys to
~/.ssh/authorized_keyson all worker nodes
From now on, every step should be executed using hadoop user we’ve just
created.
Install & Configure Hadoop
Download Hadoop package from official website.
wget http://ftp.twaren.net/Unix/Web/apache/hadoop/common/hadoop-3.1.3/hadoop-3.1.3.tar.gz
tar -zxvf hadoop-3.1.3.tar.gz
mv hadoop-3.1.3 hadoop
Append following line in ~/.profile:
PATH=/home/hadoop/hadoop/bin:/home/hadoop/hadoop/sbin:$PATH
Append following lines in ~/.bashrc:
export HADOOP_HOME=/home/hadoop/hadoop
export PATH=${PATH}:${HADOOP_HOME}/bin:${HADOOP_HOME}/sbin
Add following line in ~/hadoop/etc/hadoop/hadoop-env.sh to tell Hadoop which
Java version to use.
export JAVA_HOME=/usr/lib/jvm/java-8-openjdk-amd64/jre
In ~/hadoop/etc/hadoop/core-site.xml:
<configuration>
        <property>
                <name>fs.default.name</name>
                <value>hdfs://hadoop-master-1:9000</value>
        </property>
</configuration>
Configure HDFS
In ~/hadoop/etc/hadoop/hdfs-site.xml:
<configuration>
        <property>
                <name>dfs.namenode.name.dir</name>
                <value>/home/hadoop/data/nameNode</value>
        </property>
        <property>
                <name>dfs.datanode.data.dir</name>
                <value>/home/hadoop/data/dataNode</value>
        </property>
        <property>
                <name>dfs.replication</name>
                <value>2</value>
        </property>
</configuration>
Configure YARN
In ~/hadoop/etc/hadoop/mapred-site.xml:
<configuration>
        <property>
                <name>mapreduce.framework.name</name>
                <value>yarn</value>
        </property>
        <property>
                <name>yarn.app.mapreduce.am.env</name>
                <value>HADOOP_MAPRED_HOME=$HADOOP_HOME</value>
        </property>
        <property>
                <name>mapreduce.map.env</name>
                <value>HADOOP_MAPRED_HOME=$HADOOP_HOME</value>
        </property>
        <property>
                <name>mapreduce.reduce.env</name>
                <value>HADOOP_MAPRED_HOME=$HADOOP_HOME</value>
        </property>
</configuration>
In ~/hadoop/etc/hadoop/yarn-site.xml:
<configuration>
        <property>
                <name>yarn.acl.enable</name>
                <value>0</value>
        </property>
        <property>
                <name>yarn.resourcemanager.hostname</name>
                <value>100.74.41.144</value>
        </property>
        <property>
                <name>yarn.nodemanager.aux-services</name>
                <value>mapreduce_shuffle</value>
        </property>
</configuration>
In ~/hadoop/etc/hadoop/workers:
hadoop-worker-1
hadoop-worker-2
hadoop-worker-3
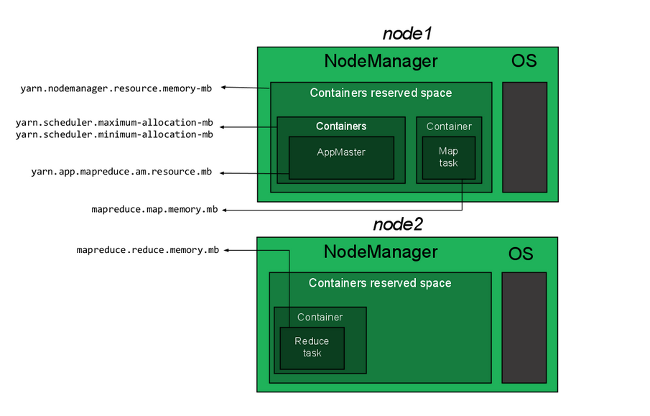
Configure Memory Allocation
There are four types of resource allocations need to be configured properly for the cluster to work.
-
How much memory can be allocated for YARN containers on a single node.
yarn.nodemanager.resource.memory-mbinyarn-site.xml
-
How much memory a single container can consume and the minimum memory allocation allowed.
yarn.scheduler.maximum-allocation-mbinyarn-site.xmlyarn.scheduler.minimum-allocation-mbinyarn-site.xml
-
How much memory will be allocated to the ApplicationMaster.
yarn.app.mapreduce.am.resource.mbinmapred-site.xml
-
How much memory will be allocated to each map or reduce operation.
mapreduce.map.memory.mbinmapred-site.xmlmapreduce.reduce.memory.mbinmapred-site.xml
In ~/hadoop/etc/hadoop/yarn-site.xml:
        <property>
                <name>yarn.nodemanager.resource.memory-mb</name>
                <value>12288</value>
        </property>
        <property>
                <name>yarn.scheduler.maximum-allocation.mb</name>
                <value>12288</value>
        </property>
        <property>
                <name>yarn.scheduler.minimum-allocation.mb</name>
                <value>128</value>
        </property>
        <property>
                <name>yarn.nodemanager.vmem-check-enabled</name>
                <value>false</value>
        </property>
In ~/hadoop/etc/hadoop/mapred-site.xml:
        <property>
                <name>yarn.app.mapreduce.am.resource.mb</name>
                <value>512</value>
        </property>
        <property>
                <name>mapreduce.map.memory.mb</name>
                <value>256</value>
        </property>
        <property>
                <name>mapreduce.reduce.memory.mb</name>
                <value>256</value>
        </property>
Dispatch Config Files to Each Worker Nodes
- Download the Hadoop binary to all worker nodes.
- Unzip the binaries, rename the directory on all worker nodes
-
Copy the Hadoop configuration files to all worker nodes:
for node in hadoop-worker-1 hadoop-worker-2 hadoop-worker-3; do
    scp ~/hadoop/etc/hadoop/* $node:/home/hadoop/hadoop/etc/hadoop/;
done