Tinc with Stunnel FTW
Server-Side
Installation
sudo apt install build-essential automake libssl-dev liblzo2-dev libbz2-dev zlib1g-dev
wget https://tinc-vpn.org/packages/tinc-1.0.33.tar.gz
tar -xf tinc-1.0.33.tar.gz
cd tinc-1.0.33
./configure --prefix=
make
sudo make install
Configuration
/etc/stunnel
pid = /var/run/stunnel.pid

[tincd]
cert = /etc/stunnel/vpnserver.crt
key = /etc/stunnel/vpnserver.key
accept = 100.74.48.65:655
connect = 127.0.0.1:655
sudo mkdir -p /etc/tinc/shpVPN/hosts
/etc/tinc/shpVPN/tinc.conf
Name = vpnserver
Device = /dev/net/tun
AddressFamily = ipv4
Generating keys
sudo tincd -n shpVPN -K
/etc/tinc/shpVPN/hosts/vpnserver with 600
Address = 100.74.48.65
BindToAddress = 127.0.0.1
Port = 655
Subnet = 10.99.0.100/32
Subnet = 10.5.0.0/16
-----BEGIN RSA PUBLIC KEY-----
...
...
...
-----END RSA PUBLIC KEY-----
/etc/tinc/shpVPN/hosts/desktop with 600
Subnet = 10.99.0.1/32
-----BEGIN RSA PUBLIC KEY-----
...
...
...
-----END RSA PUBLIC KEY-----
/etc/tinc/shpVPN/tinc-up
#!/bin/sh
ip link set $INTERFACE up
ip addr add 10.99.0.100 dev $INTERFACE
ip route add 10.99.0.0/24 dev $INTERFACE
/etc/tinc/shpVPN/tinc-down
#!/bin/sh
ip route del 10.99.0.0/24 dev $INTERFACE
ip addr del 10.99.0.100 dev $INTERFACE
ip link set $INTERFACE down
/etc/systemd/system/tinc.service
[Unit]
Description=Tinc net shpVPN
After=network.target

[Service]
Type=simple
WorkingDirectory=/etc/tinc/shpVPN
ExecStart=/sbin/tincd -n shpVPN -D -d3
ExecReload=/sbin/tincd -n shpVPN -kHUP
TimeoutStopSec=5
Restart=always
RestartSec=60

[Install]
WantedBy=multi-user.target
sudo chmod -v +x /etc/tinc/shpVPN/tinc-{up,down}
Running
sudo tincd -n shpVPN -D -d3
Or
sudo systemctl start tinc.service
Client-Side
Installation
Reboot Windows 10 without driver signature checking. To permanently disable
Windows 10’s driver signature check, start cmd.exe with administrator
privilege and execute:
C:\Windows\system32>bcdedit.exe /set nointegritychecks on
Then reboot again.
To add an software emulated network interface, start cmd.exe with
administrator authority to execute addtap.bat:
C:\Program Files (x86)\tinc\tap-win64>addtap.bat

C:\Program Files (x86)\tinc\tap-win64>rem Add a new TAP virtual ethernet adapter

C:\Program Files (x86)\tinc\tap-win64>cd /d C:\Program Files (x86)\tinc\tap-win64\

C:\Program Files (x86)\tinc\tap-win64>tapinstall.exe install OemWin2k.inf tap0901
Device node created. Install is complete when drivers are installed...
Updating drivers for tap0901 from C:\Program Files (x86)\tinc\tap-win64\OemWin2k.inf.
Drivers installed successfully.

C:\Program Files (x86)\tinc\tap-win64>pause
Press any key to continue . . .
Configuration
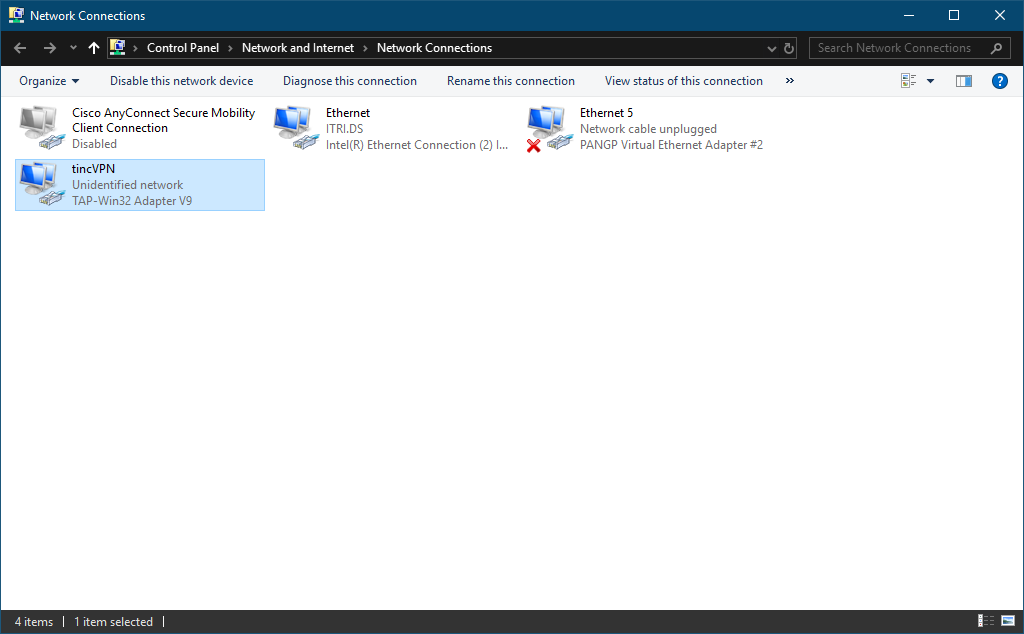
C:\Users\A70001.ITRI>netsh interface set interface name="Ethernet 4" newname="tincVPN"
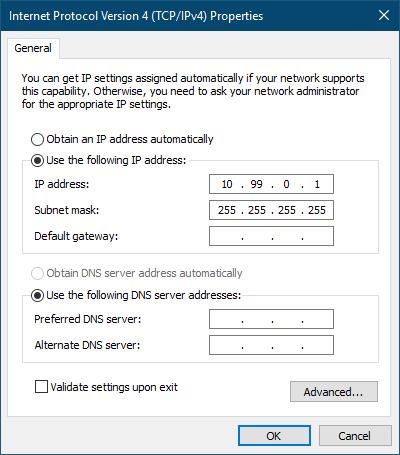
C:\Users\A70001.ITRI>netsh interface ip set address name="tincVPN" source=static address=10.99.0.1 mask=255.255.255.255 gateway=none
C:\Program Files (x86)\stunnel\config\stunnel.conf
[tinc]
client = yes
accept = 127.0.0.1:9487
connect = 100.74.48.65:655
CAfile = vpnserver.crt
verify = 4
Copy vpnserver.crt on VPN server to VPN client under C:\Program Files
(x86)\stunnel\config.
Create shpVPN folder under C:\Program Files (x86)\tinc and then run the
following command to generate RSA keys for the VPN client:
C:\Program Files (x86)\tinc>tincd.exe -n shpVPN -K
The above command will generate new key pair for the client. You will need to
update corresponding part of desktop file on both server and client.
C:\Program Files (x86)\tinc\shpVPN\tinc.conf
Name = desktop
Interface = tincVPN
ConnectTo = vpnserver
C:\Program Files (x86)\tinc\shpVPN\hosts\desktop
Subnet = 10.99.0.1/32
-----BEGIN RSA PUBLIC KEY-----
MIIBCgKCAQEAuUVnc6xF7tLEt0o4yJ6EYbuVnLBNHYhO8COXwcb+d/VZ2zlGG6rL
mz75iGFp/2WCO48Q8aODctbY04Y26j4K8YnzRQkLrxao6qeKEbSQCqDziqY4W5lu
ZWBjZCEjA8B5/XRNPhDl4i2/MYeVsiY6GLSrxOe0FNE/R3oRU2YUCtugcPU1FNFm
BsjPIhhOLQsbZTmnmf7yuYvQllo9m7yl3tOeo7gJ2P4qbI6k9WcwuFOFHjgX4uFG
MevJhLKh906Qw8nrRudGR06311WAC9QGu42ublv33gRzsfz1Fn+xxBW1wQXcvQmE
P/rgaut7PTHN2o9eVH4po9g+PqkvUJkSIwIDAQAB
-----END RSA PUBLIC KEY-----
C:\Program Files (x86)\tinc\shpVPN\hosts\vpnserver
Address = 127.0.0.1
Port = 9487
Subnet = 10.99.0.100/32
Subnet = 10.5.0.0/16
-----BEGIN RSA PUBLIC KEY-----
MIIBCgKCAQEA0ZAGqivOCx7qMRgt5TUyOMHN1jFBzhRzSQlN/L/smJ9HSpK/GLLl
O9t8vwWq123bUPoxTfhg2fL6WZod5W/CSfNROvOciY+io2AtVUh+byUc1I+frY2T
17Zf0/tGhLk1t2mrnTXwH6wCXtfss2OCkL7Q90SRgEj4a/FsETcZjKa49scWWg88
zkzPpXNl1e0mZqvse2T/umyXjzeJUJvrRqtW8Me/thpHnnY7sK95Vf9ky0YuBAnh
3kOCEhXLEtItqQ11d5NUjXFdXKa9s7yu8JcWHG7HDnobE2CzxHDB2AZoqFkJSQO1
OY2YF6XxVFGCSFReejERVwc3jAWiTtzohwIDAQAB
-----END RSA PUBLIC KEY-----
Running
First we need to kickoff stunnel. Open Windows start menu and search for
“stunnel Service Install”. This will install stunnel as a service so that it
will start at system boot up. And the second step is search for “stunnel Service
Start” to actually start the stunnel service. After a few seconds there’s a
little popup window shows that it is running. But how can I tell it is running
without any issue?
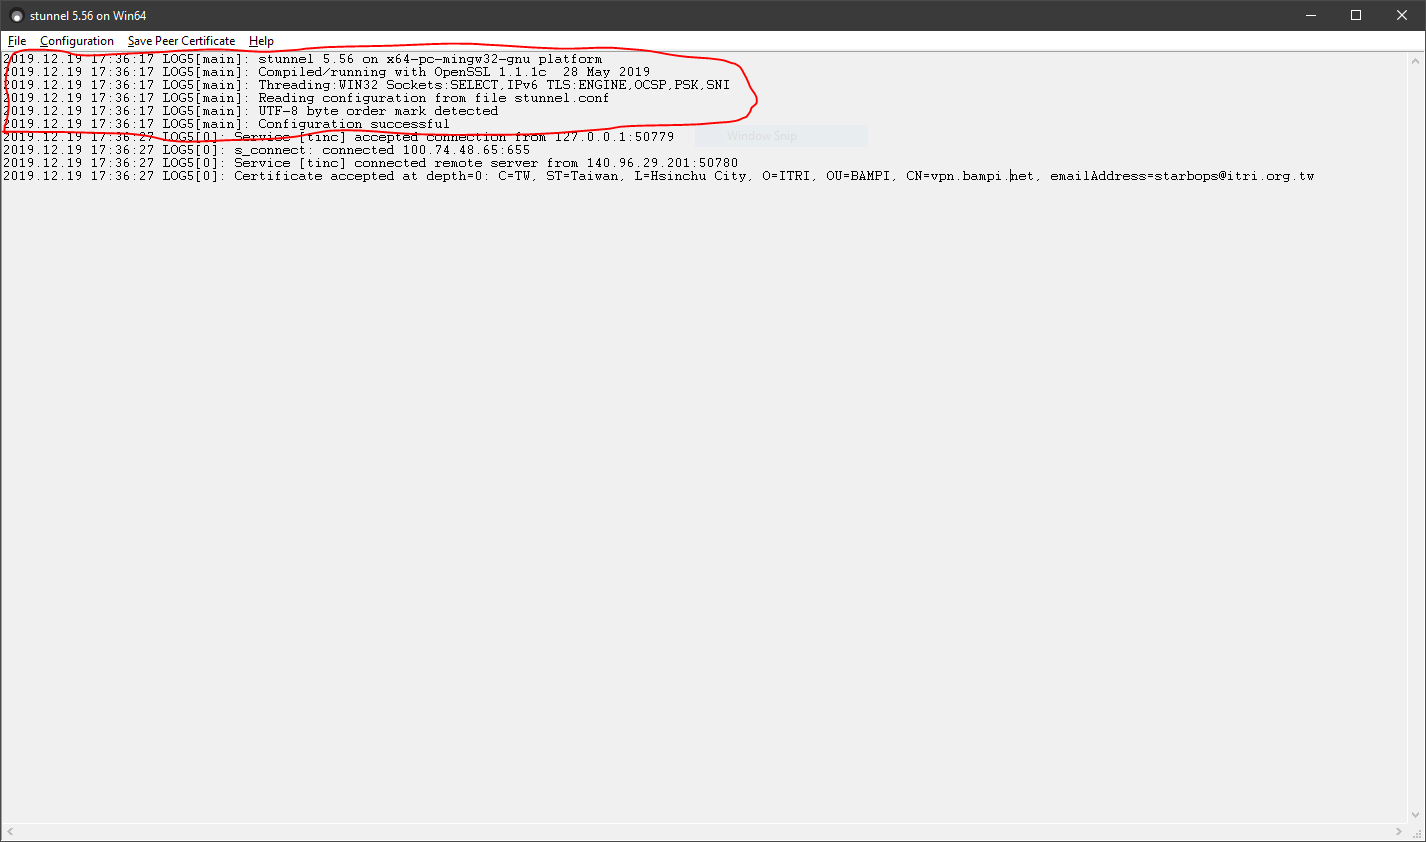
To make sure that stunnel is running without any problems, open log window of
stunnel by clicking the little icon in bottom right system tray. If there’s no
that kind of icon, just open Windows start menu and search for “stunnel GUI
Start” (please make sure stunnel is not running yet, because doing this will
start the service which is duplicated and failed to start). A correctly
configured stunnel service’s log should look like this (red circle part):
If stunnel is good, then we can start up tincd:
C:\Program Files (x86)\tinc>tincd.exe -n shpVPN -D -d3
Routing
On VPN server:
sudo sysctl -w net.ipv4.ip_forward=1
On VyOS router:
$ conf
# set protocols static route 10.99.0.0/24 next-hop 10.5.0.65 distance 1
# save
On VPN client:
C:\Windows\system32>netsh interface ipv4 show interfaces

Idx     Met         MTU          State                Name
---  ----------  ----------  ------------  ---------------------------
  1          75  4294967295  connected     Loopback Pseudo-Interface 1
  5          25        1500  connected     Ethernet
 16          20        1400  disconnected  Ethernet 3
 14          55        1500  disconnected  tincVPN

C:\Windows\system32>route -p ADD 10.5.0.0 MASK 255.255.0.0 10.99.0.100 IF 14
 OK!
Troubleshooting
Windows Firewall
References
- How to Set up tinc, a Peer-to-Peer VPN
- How to install and configure tinc on Windows 7 and Ubuntu 10.10 Linux and CentOS 5
- TAP installer failed on Windows 10 1709 with 2.4.6
- GitHub - OpenVPN/tap-windows6: Windows TAP driver (NDIS 6)
- Quick & Easy: Tinc 1.1pre15 VPN between Windows Systems
- Setting Up a VPN with Tinc VPN Software
- How To Encrypt Traffic to Redis with Stunnel on Ubuntu 16.04
- Private VPN with TINC
- How Do I Reach Local Subnet Behind Tinc VPN
- tinc.conf.5
- Static routing - VyOS Wiki
- How to Add a Static TCP/IP Route to the Windows Routing Table